Unit 1: Practice Problem Sets
Lesson 1
Problem 1
The six frames show a shape's different positions.
Describe how the shape moves to get from its position in each frame to the next.
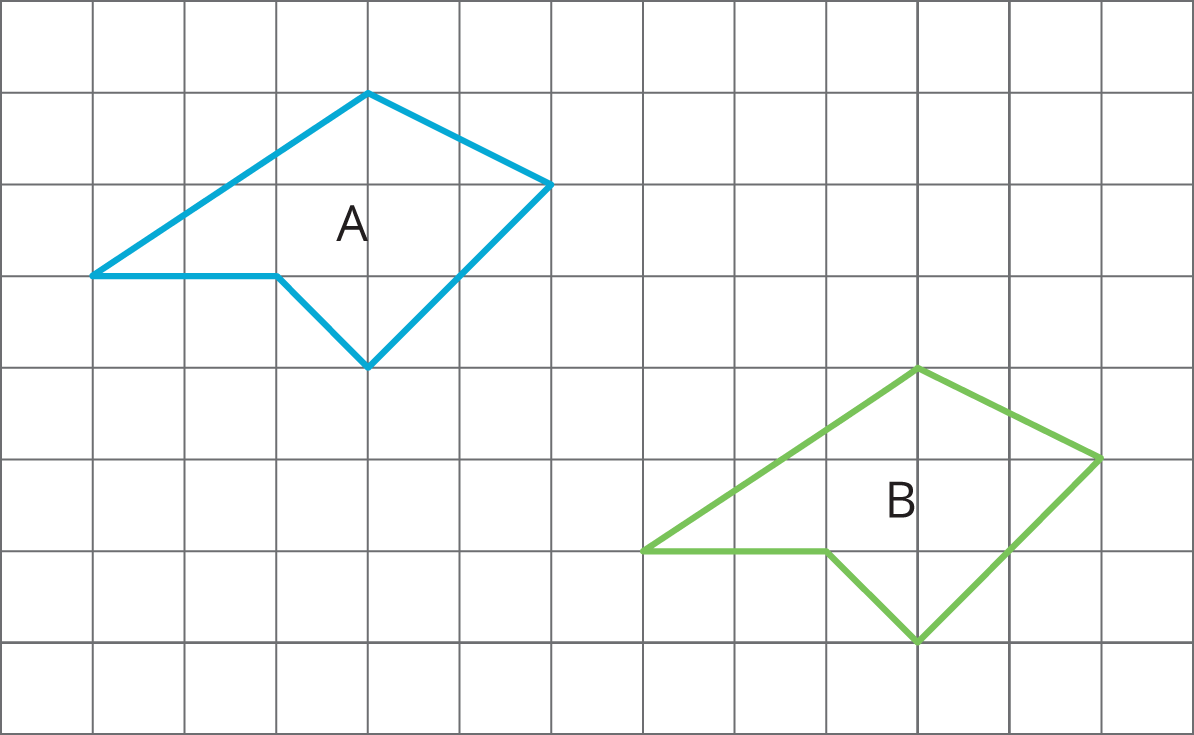
Problem 2
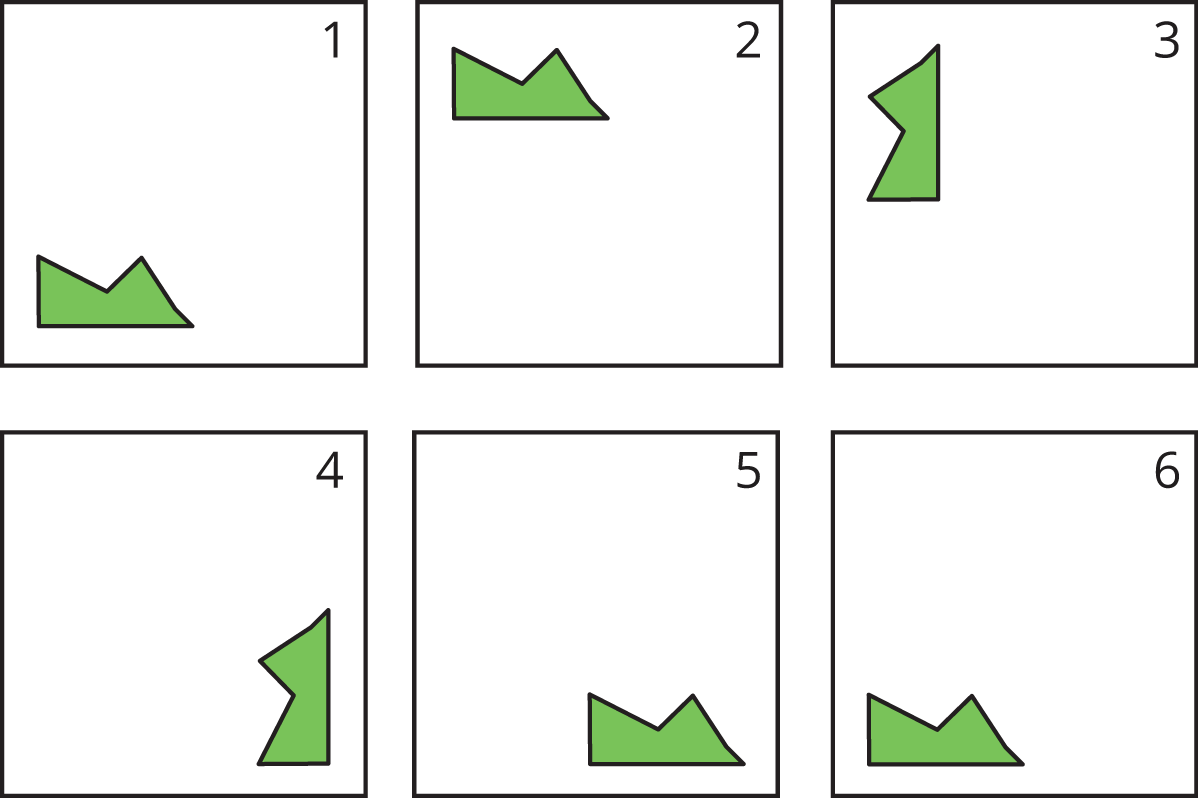
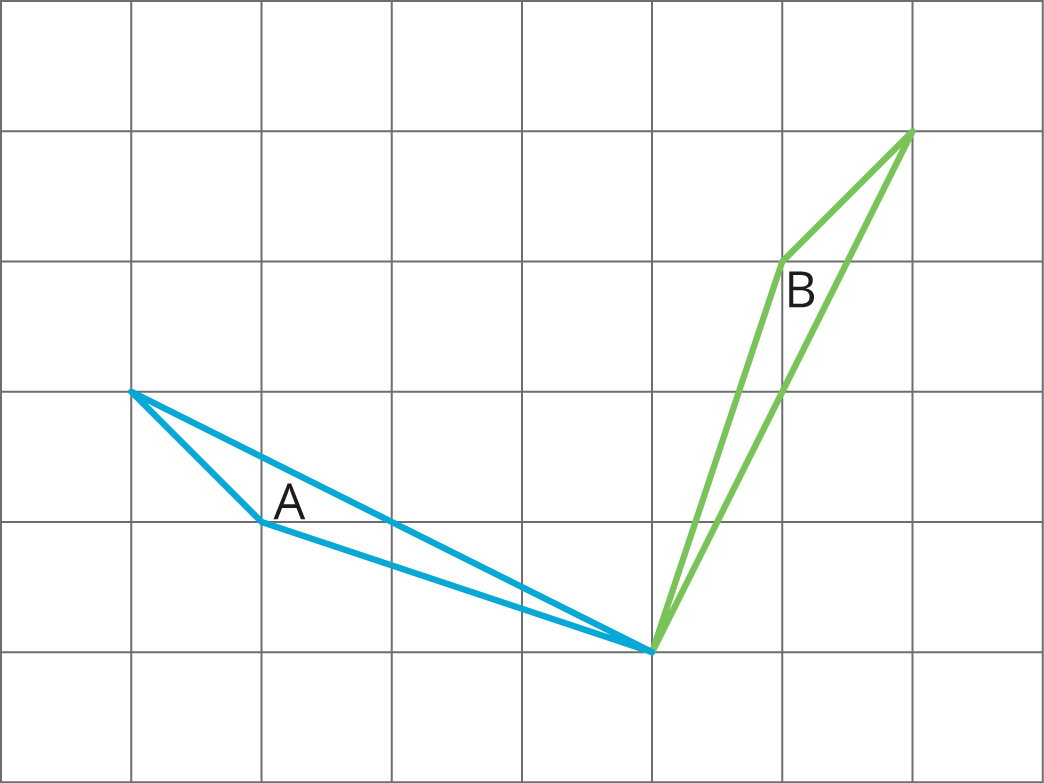
These five frames show a shape's different positions.
Describe how the shape moves to get from its position in each frame to the next.
Problem 3
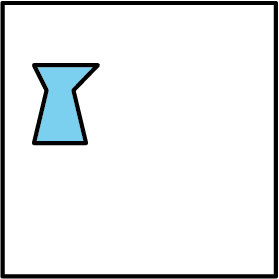
Diego started with this shape.
Diego moves the shape down, turns it 90 degrees clockwise, then moves the shape to the right. Draw the location of the shape after each move.
Lesson 2
Problem 1
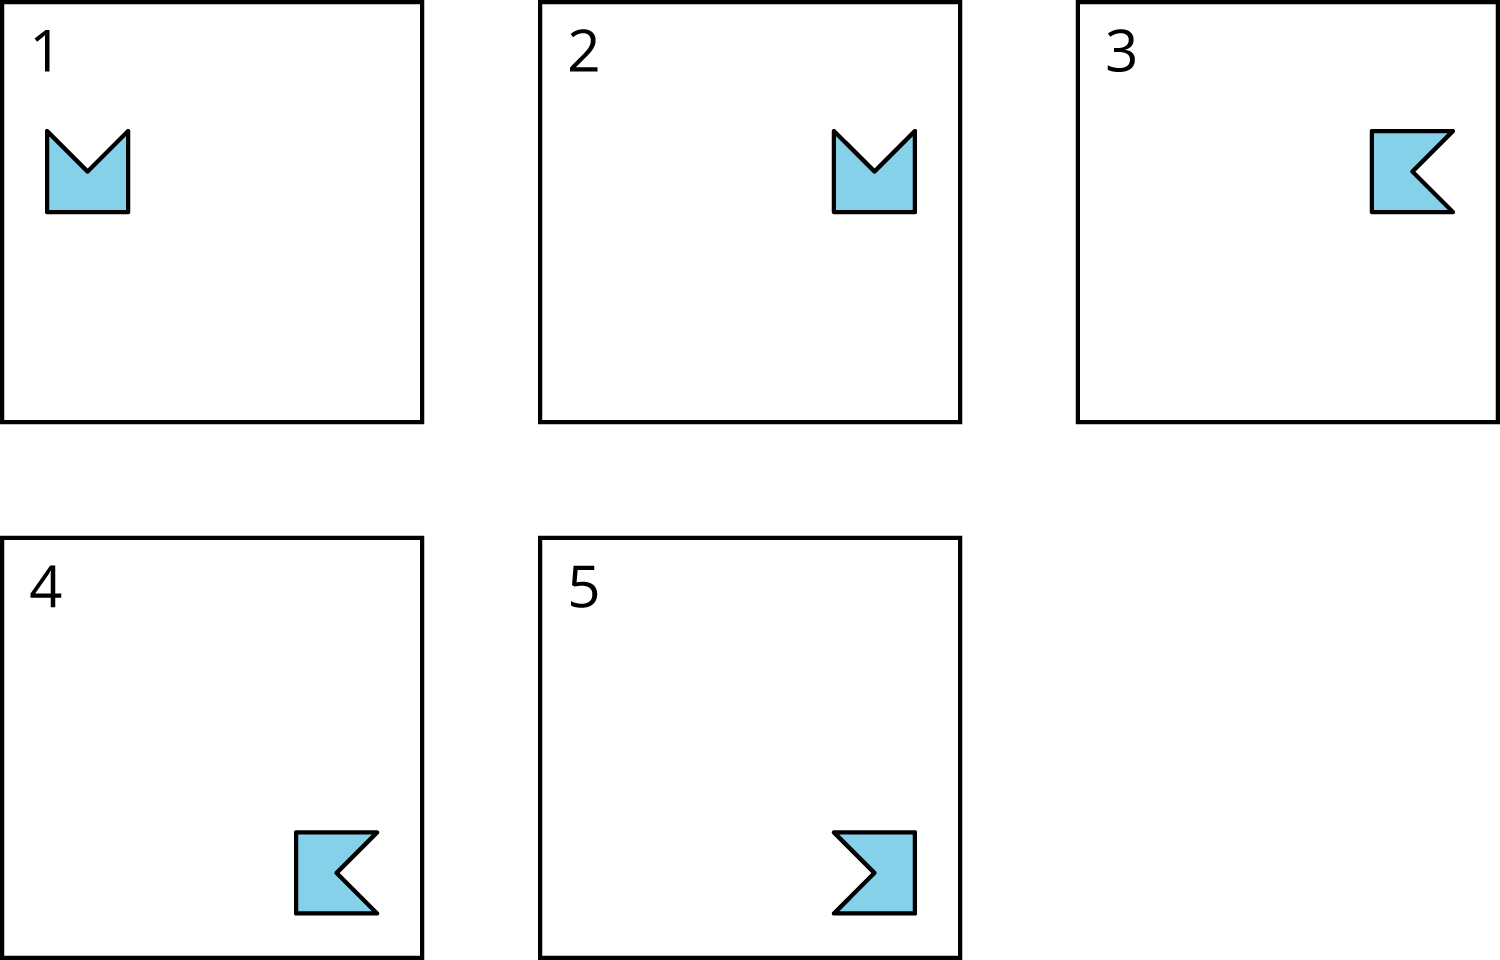
Each of the six cards shows a shape.

- Which pair of cards shows a shape and its image after a rotation?
- Which pair of cards shows a shape and its image after a reflection?
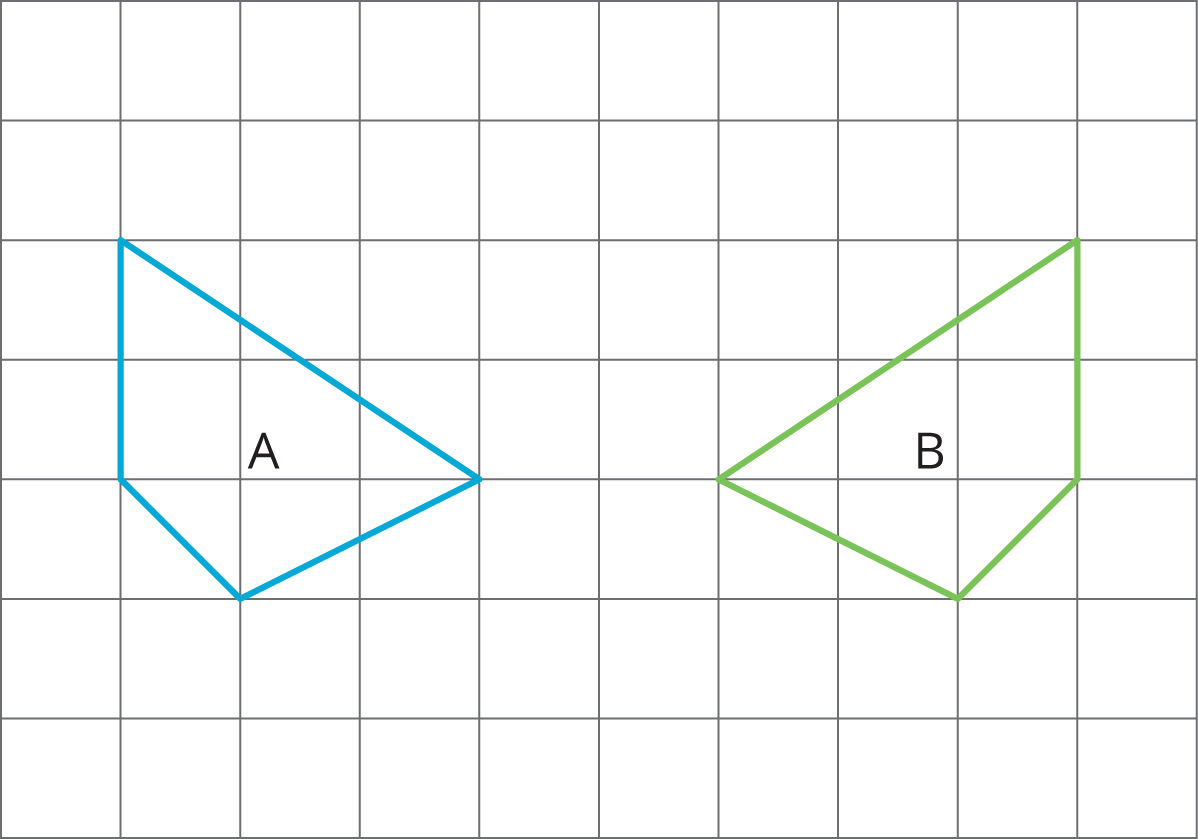
Problem 2
The five frames show a shape's different positions.
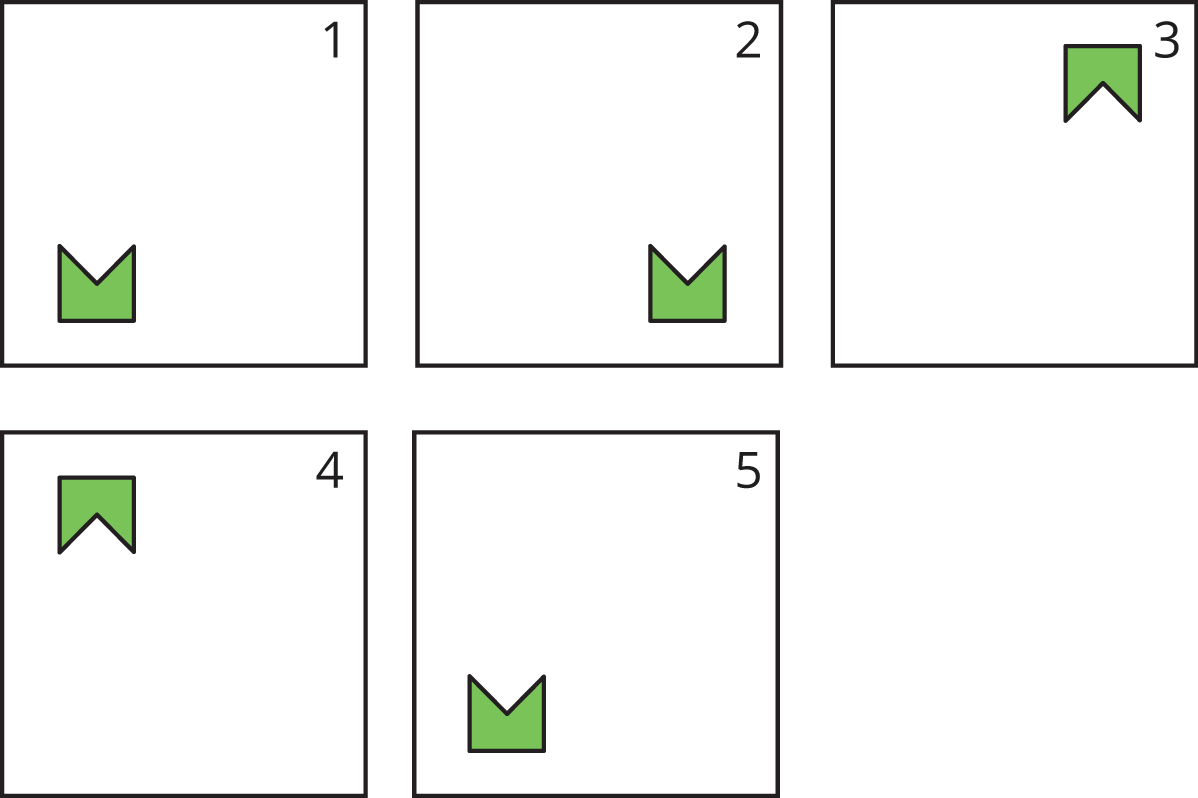
Describe how the shape moves to get from its position in each frame to the next.
Problem 3 (from Unit 1, Lesson 1)
The rectangle seen in Frame 1 is rotated to a new position, seen in Frame 2.
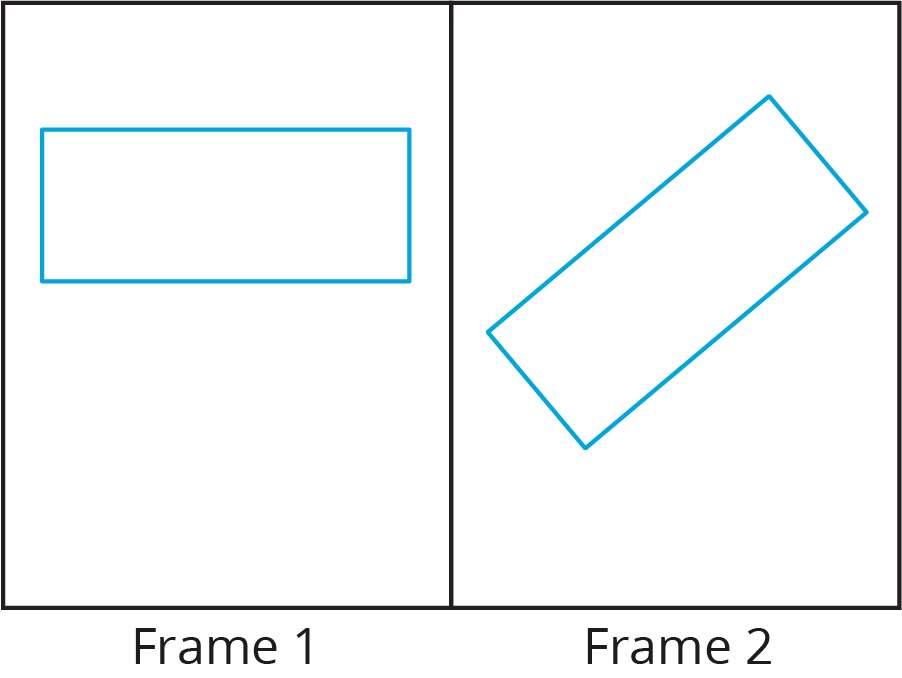
Select all the ways the rectangle could have been rotated to get from Frame 1 to Frame 2.
- 40 degrees clockwise
- 40 degrees counterclockwise
- 90 degrees clockwise
- 90 degrees counterclockwise
- 140 degrees clockwise
- 140 degrees counterclockwise
Lesson 3
Problem 1
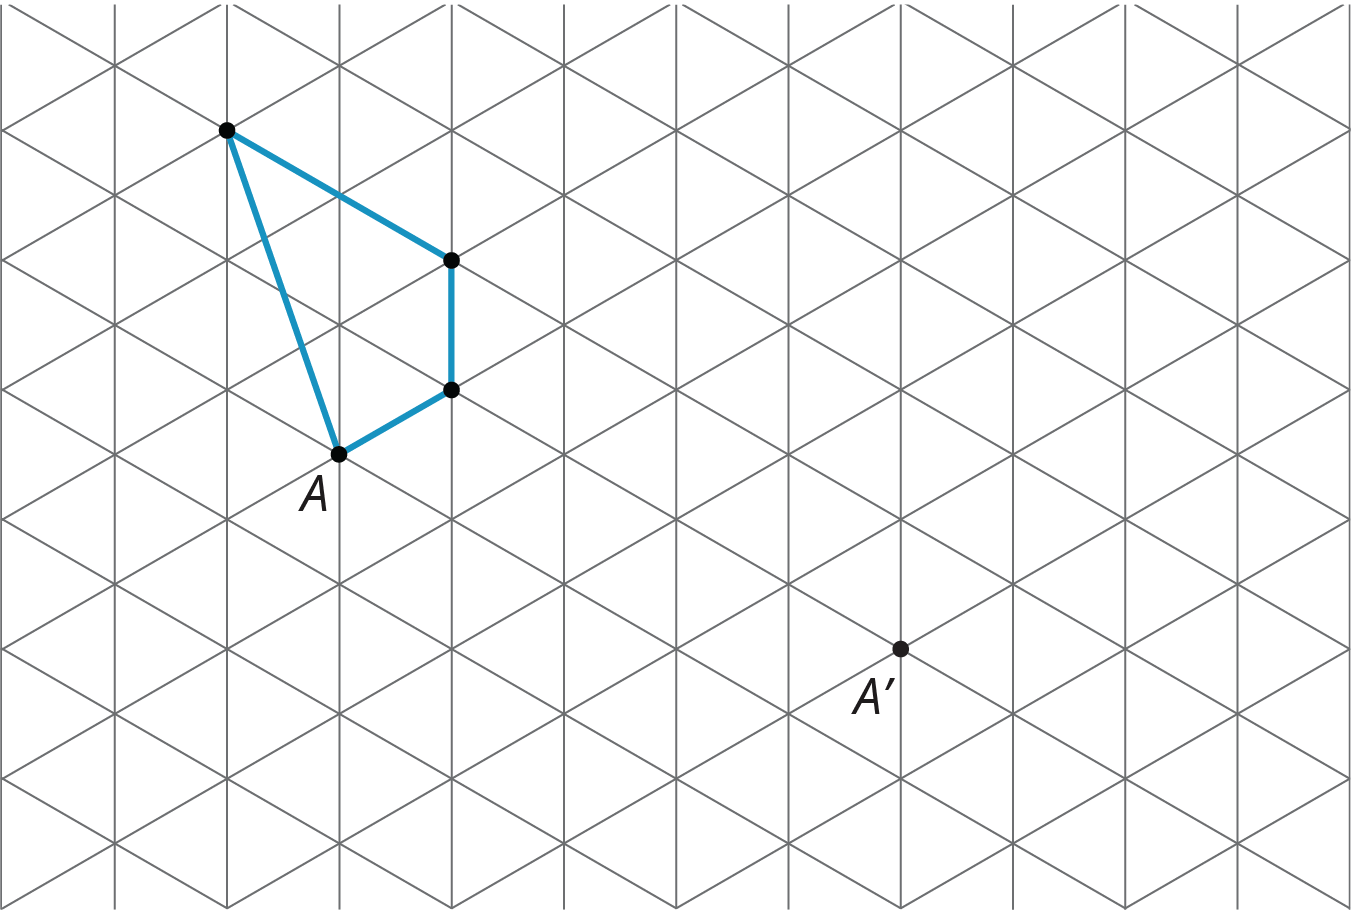
Apply each transformation described to Figure A. If you get stuck, try using tracing paper.
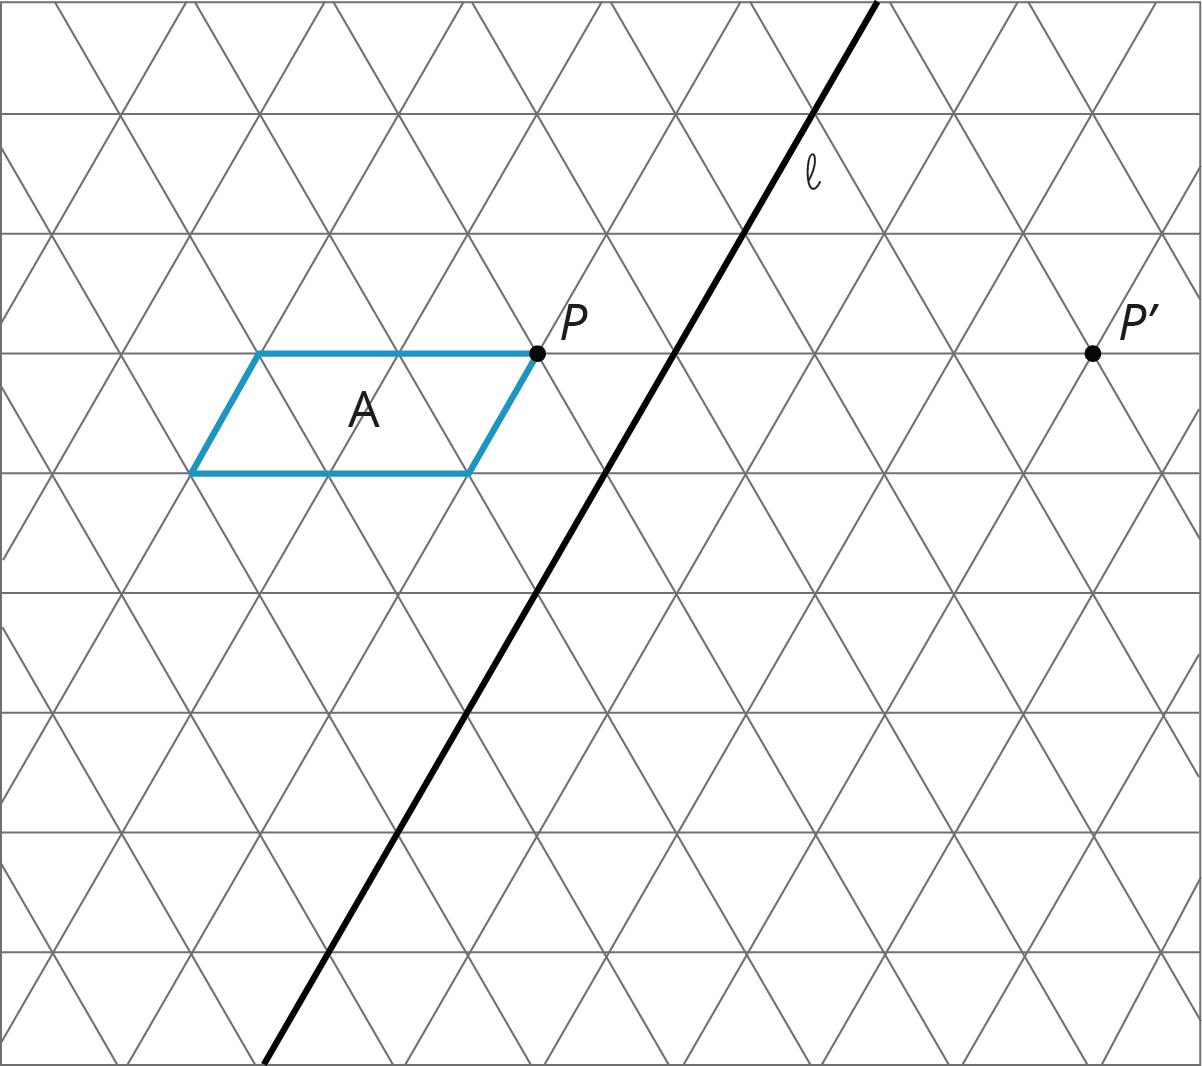
- A translation which takes $P$ to $P’$
- A counterclockwise rotation of A, using center $P$, of 60 degrees
- A reflection of A across line $\ell$
Problem 2
Here is triangle $ABC$ drawn on a grid.
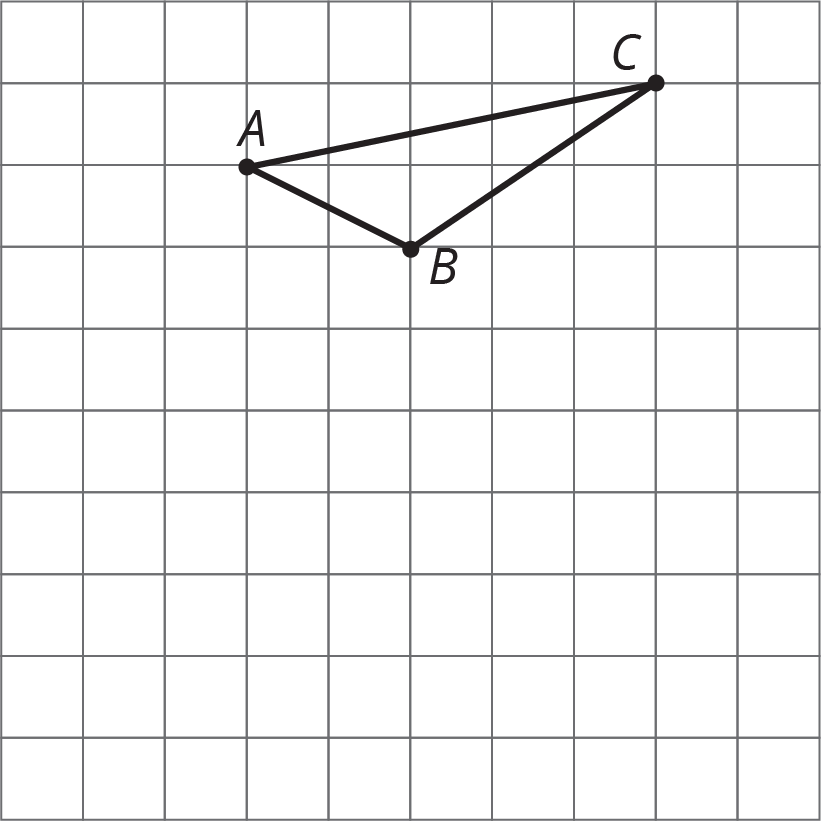
On the grid, draw a rotation of triangle $ABC$, a translation of triangle $ABC$, and a reflection of triangle $ABC$. Describe clearly how each was done.
Problem 3 (from Unit 1, Lesson 2)
- Draw the translated image of $ABCDE$ so that vertex $C$ moves to $C’$. Tracing paper may be useful.

- Draw the reflected image of Pentagon $ABCDE$ with line of reflection $\ell$. Tracing paper may be useful.

- Draw the rotation of Pentagon $ABCDE$ around $C$ clockwise by an angle of 150 degrees. Tracing paper and a protractor may be useful.

Lesson 4
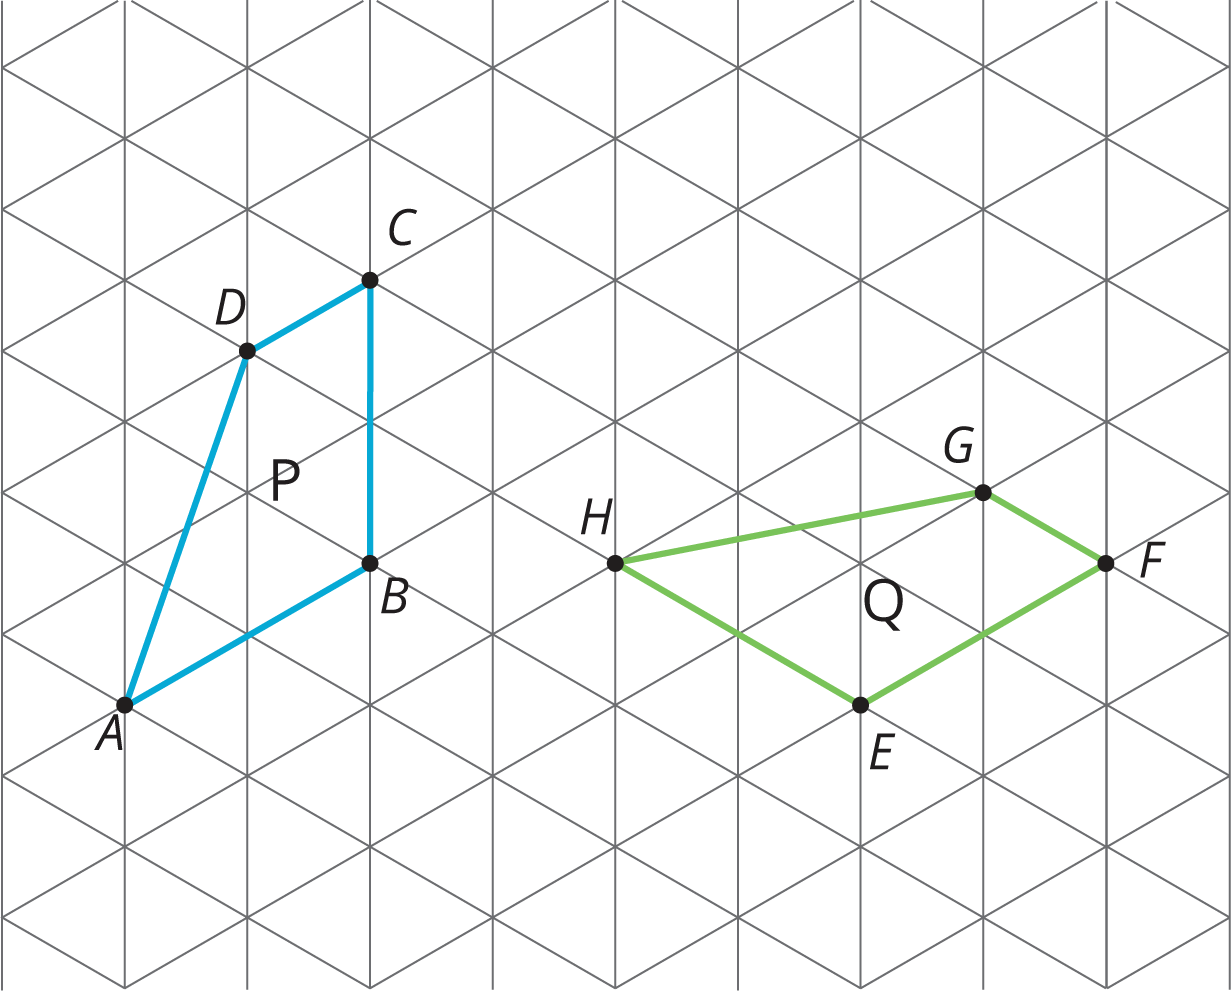
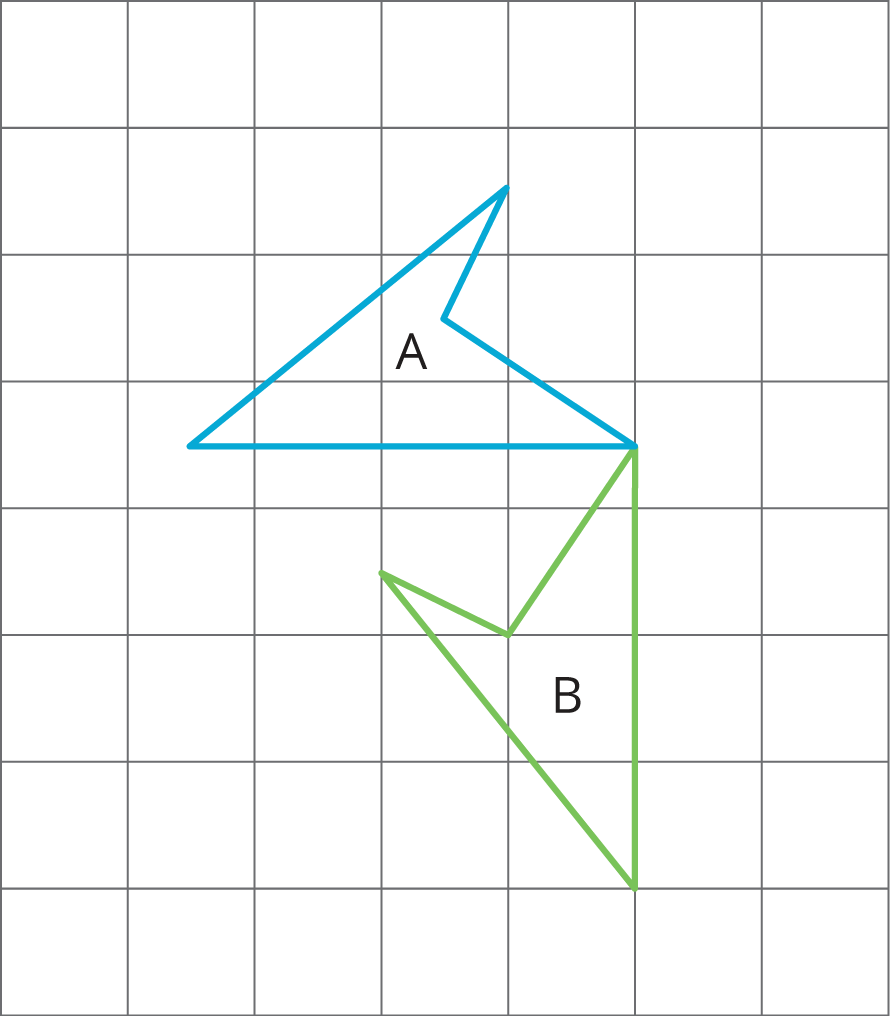
Problem 1
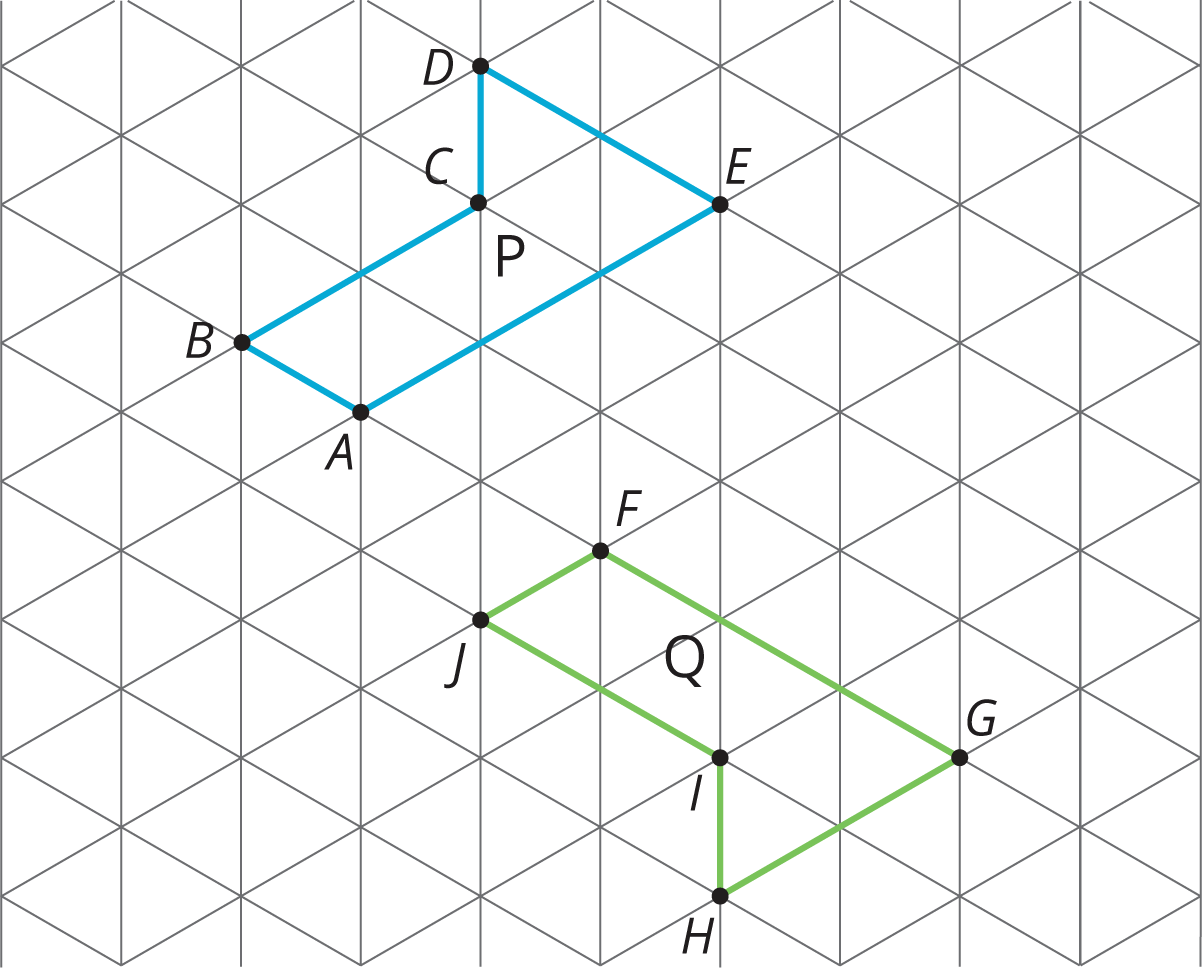
For each pair of polygons, describe a sequence of translations, rotations, and reflections that takes Polygon P to Polygon Q.

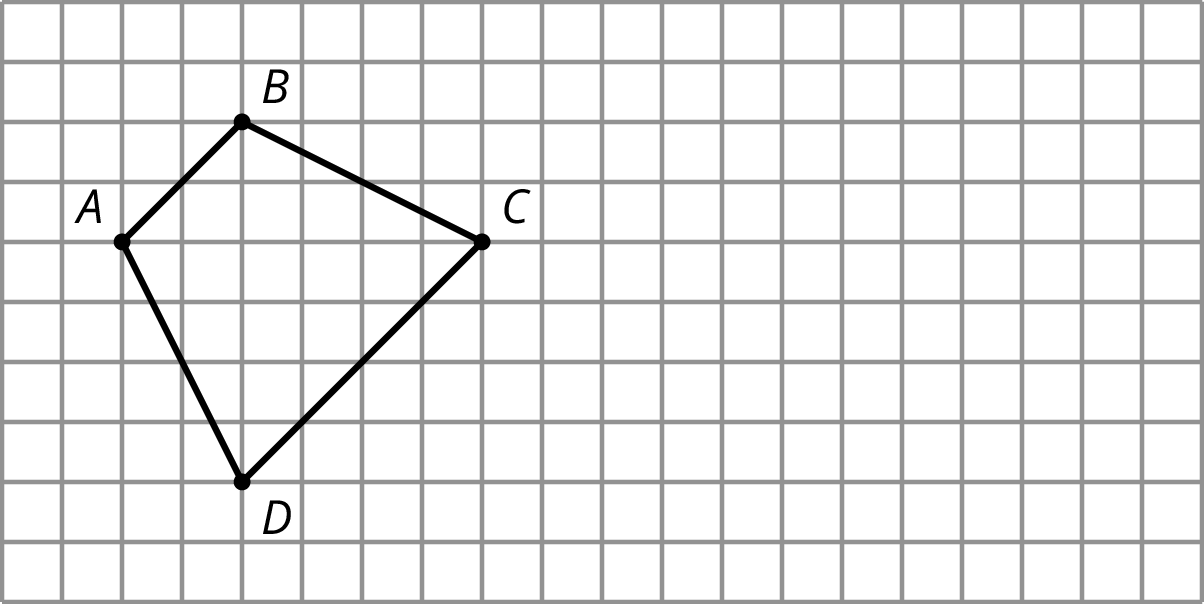
Problem 2 (from Unit 1, Lesson 2)
Here is quadrilateral $ABCD$ and line $\ell$.
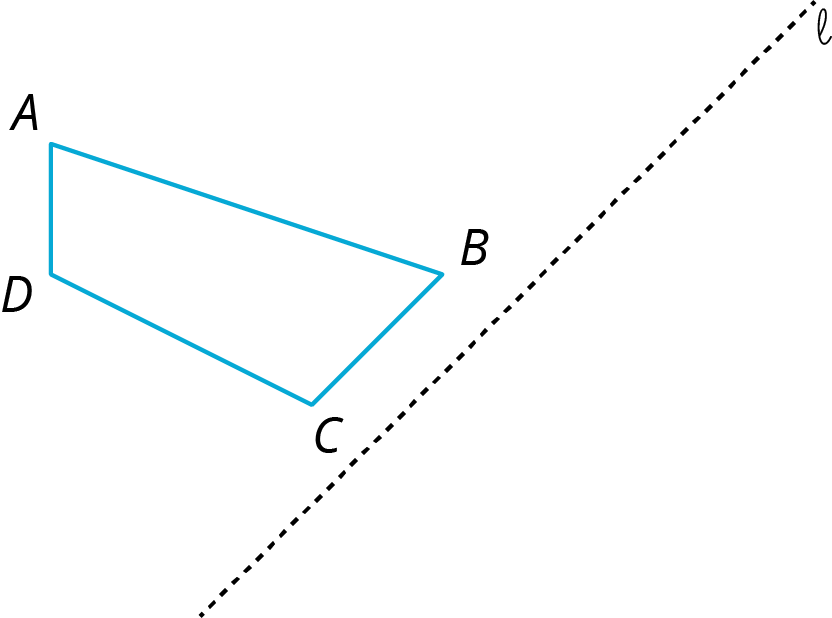
Draw the image of quadrilateral $ABCD$ after reflecting it across line $\ell$.
Problem 3 (from Unit 1, Lesson 2)
Here is quadrilateral $ABCD$.
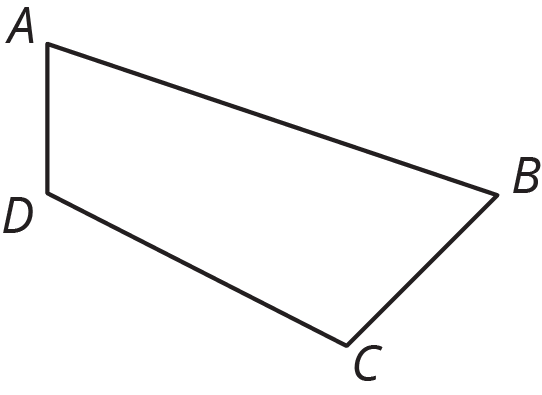
Draw the image of quadrilateral $ABCD$ after each rotation using $B$ as center.
- 90 degrees clockwise
- 120 degrees clockwise
- 30 degrees counterclockwise
Lesson 5
Problem 1
- Here are some points.
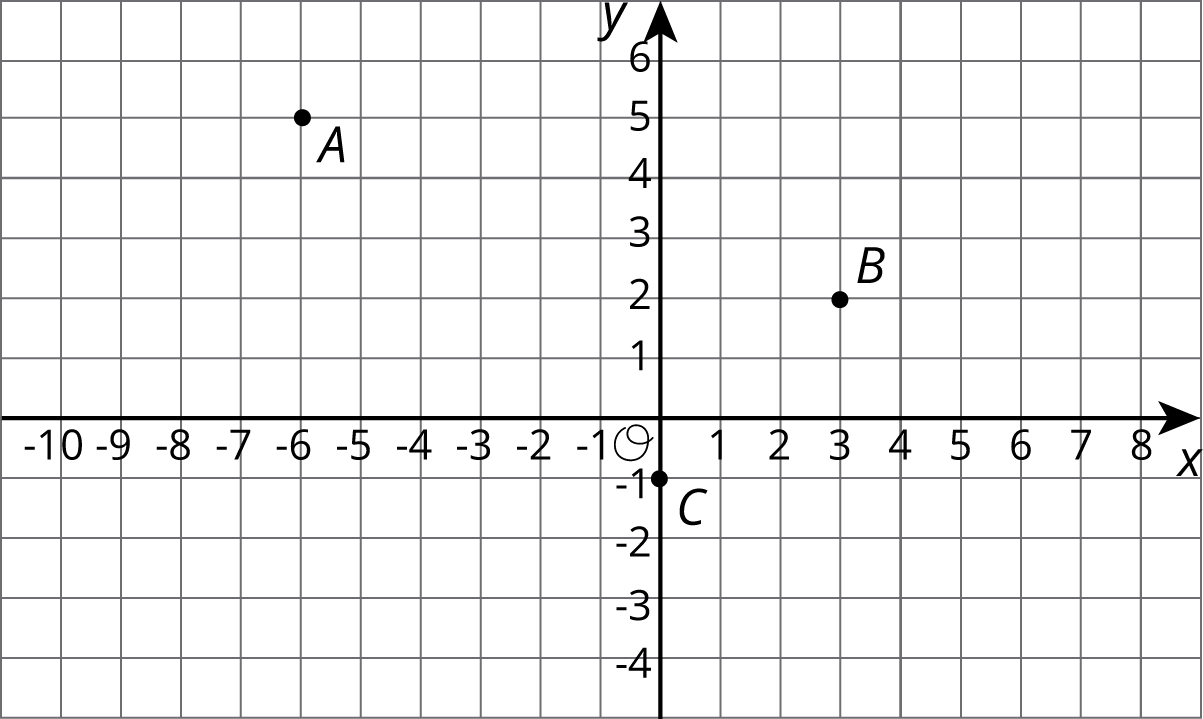
What are the coordinates of $A$, $B$, and $C$ after a translation to the right by 4 units and up 1 unit? Plot these points on the grid, and label them $A’$, $B’$ and $C’$.
- Here are some points.
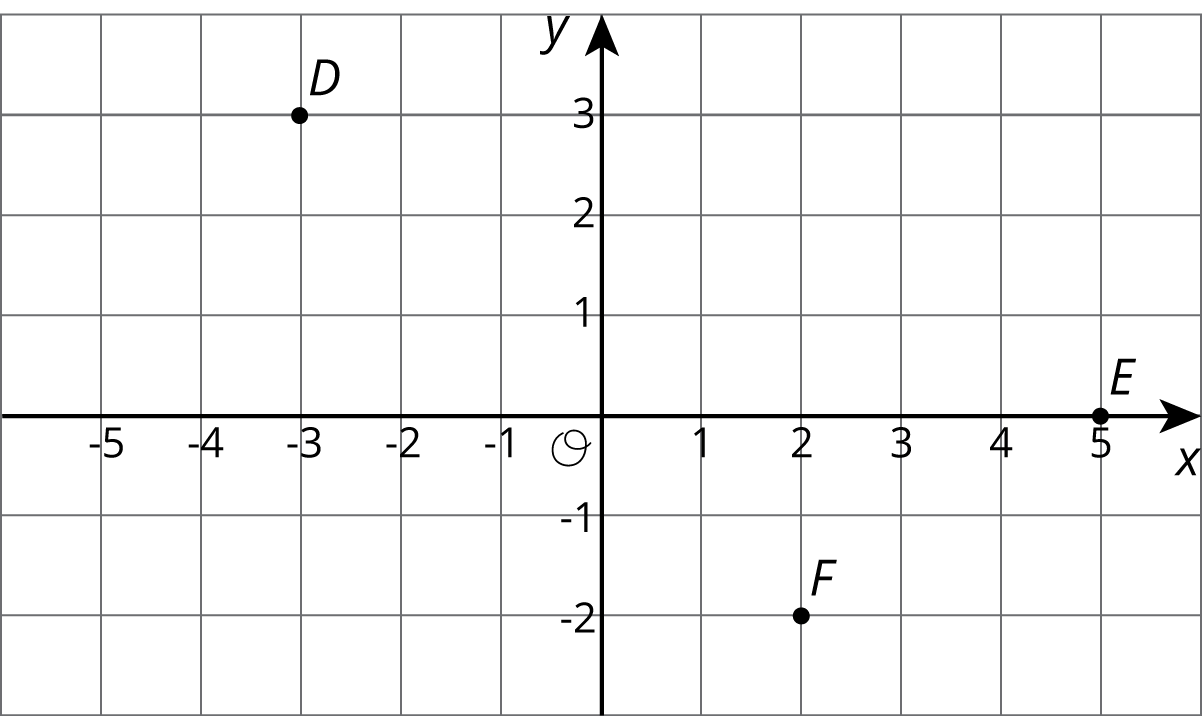
What are the coordinates of $D$, $E$, and $F$ after a reflection over the $y$ axis? Plot these points on the grid, and label them $D’$, $E’$ and $F’$.
- Here are some points.
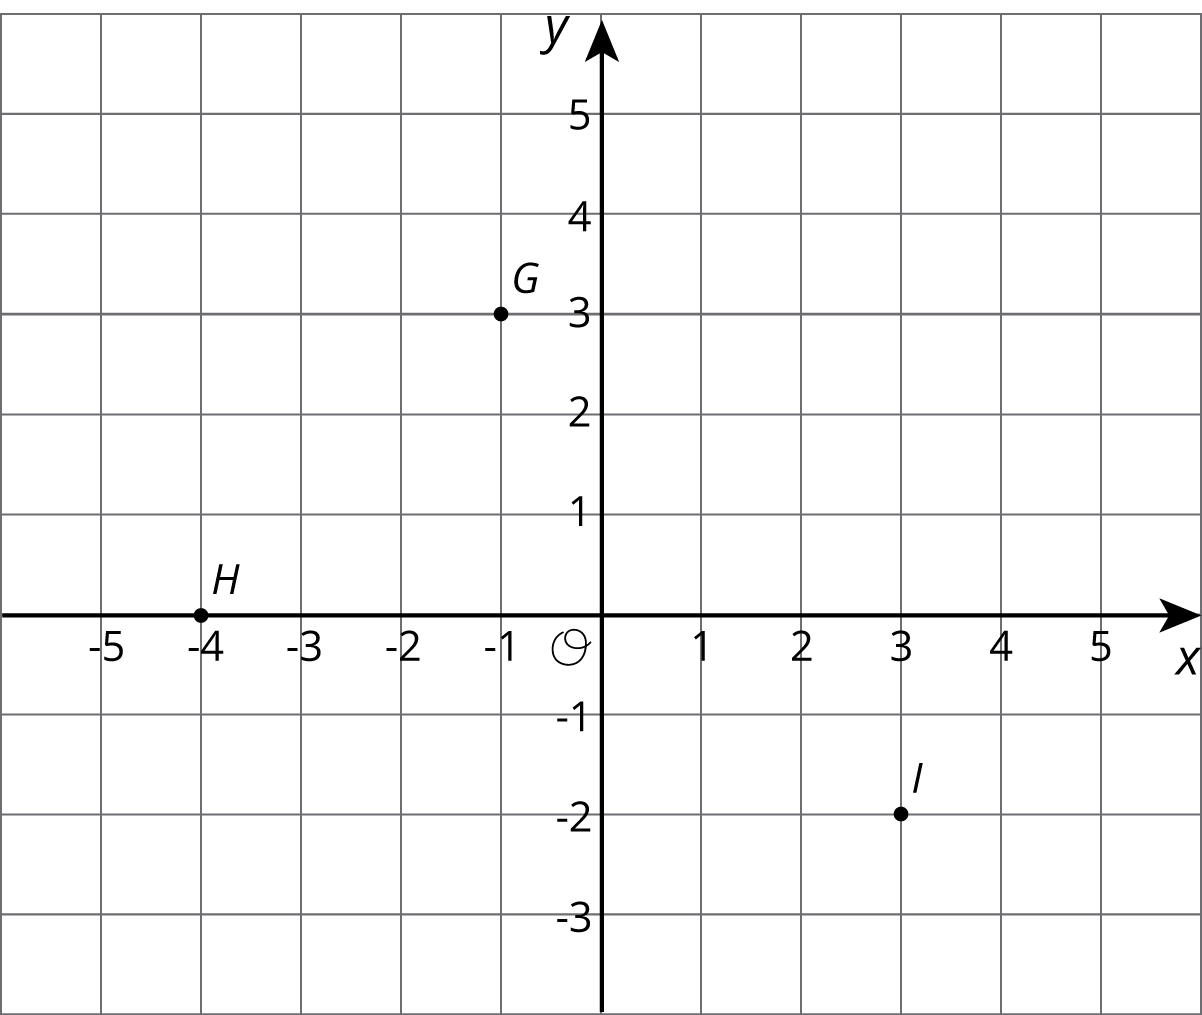
What are the coordinates of $G$, $H$, and $I$ after a rotation about $(0,0)$ by 90 degrees clockwise? Plot these points on the grid, and label them $G’$, $H’$ and $I’$.
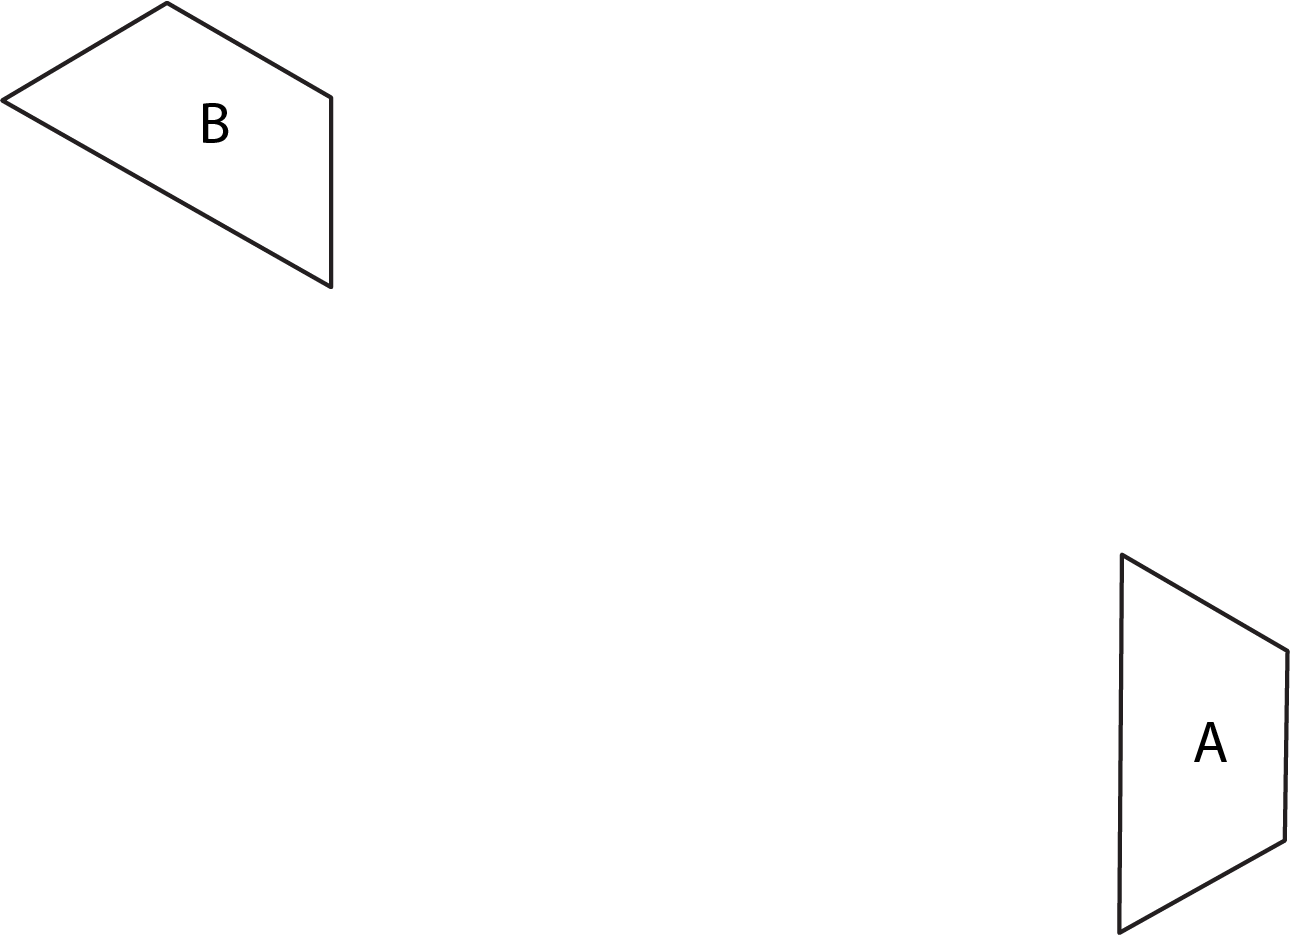
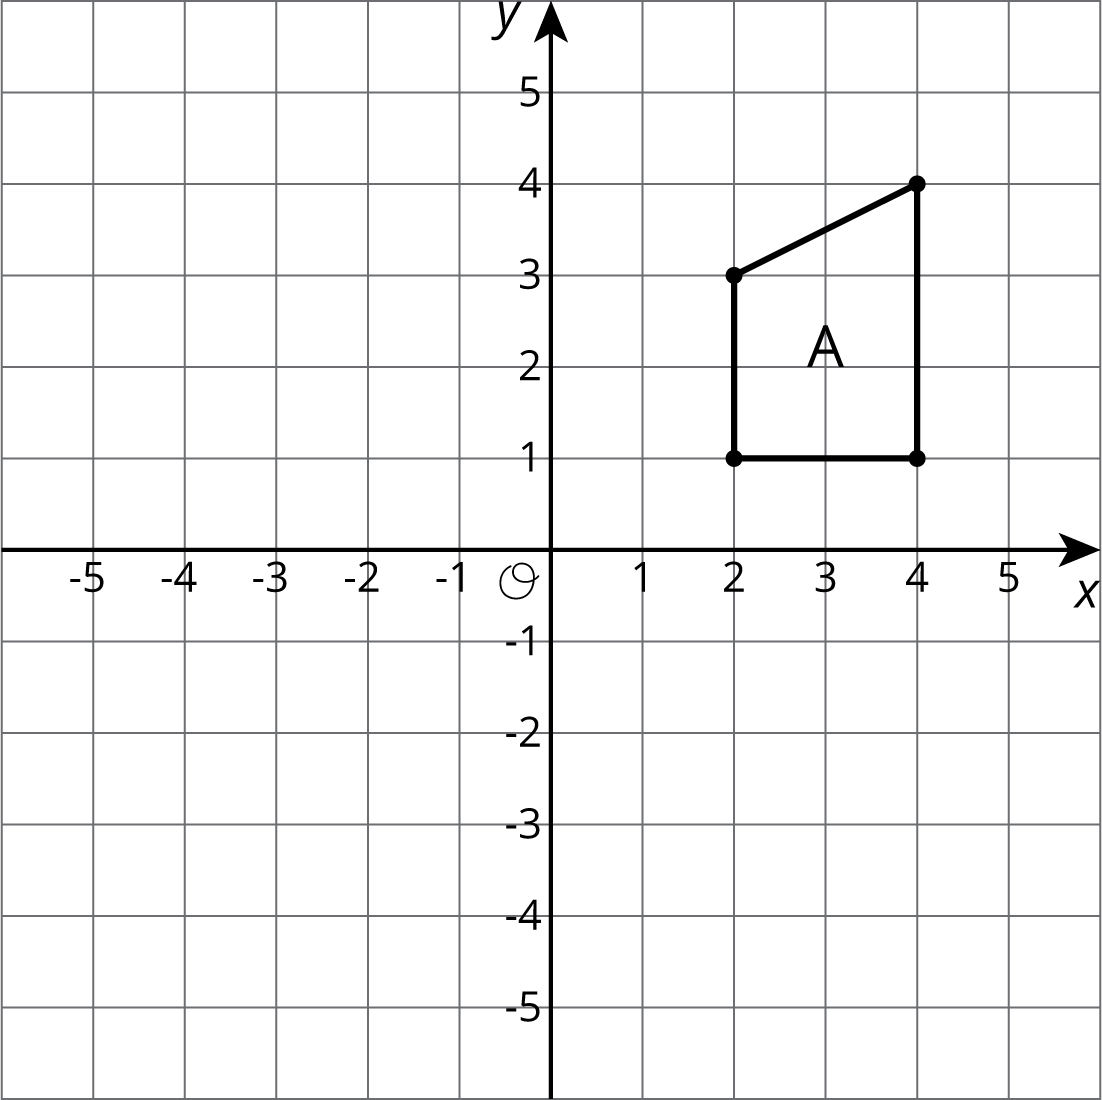
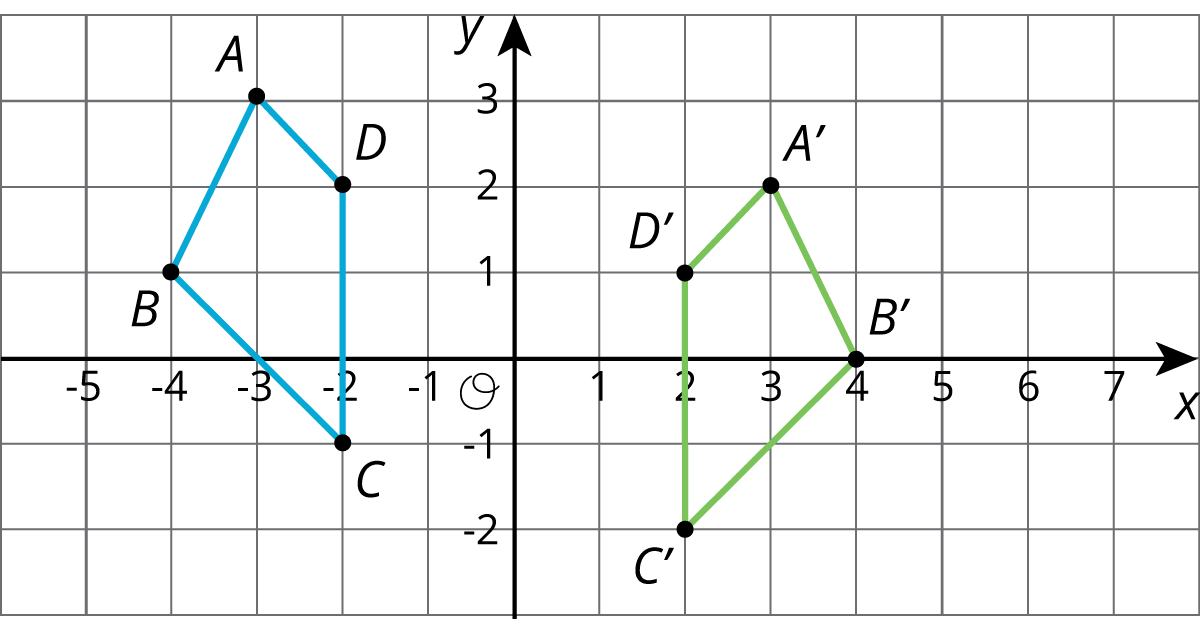
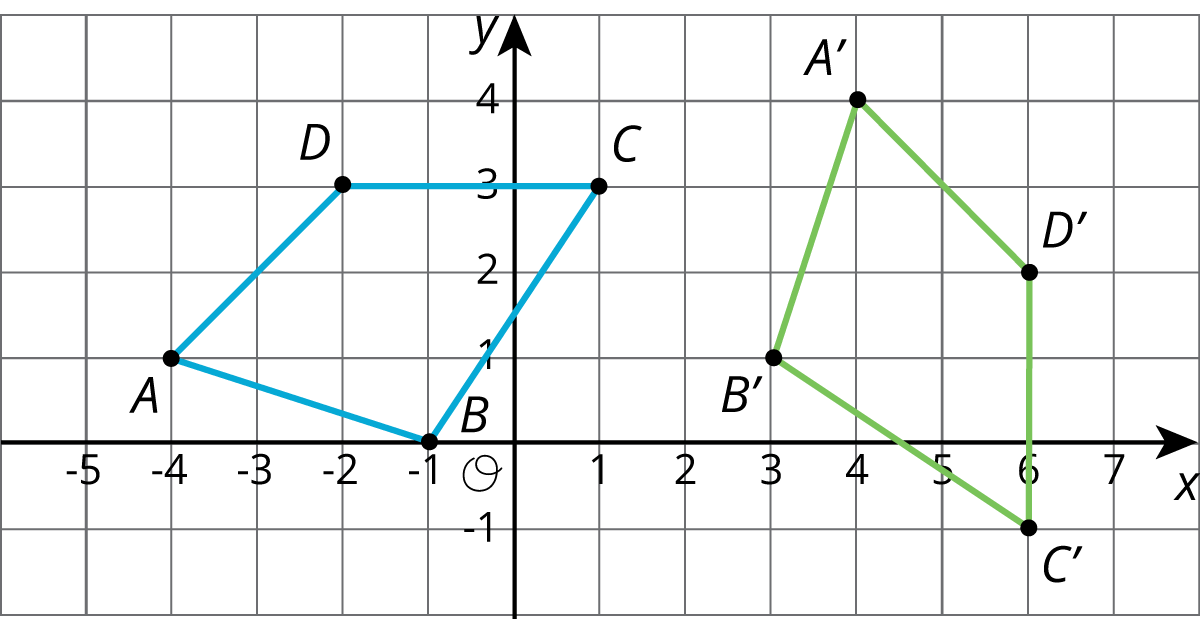
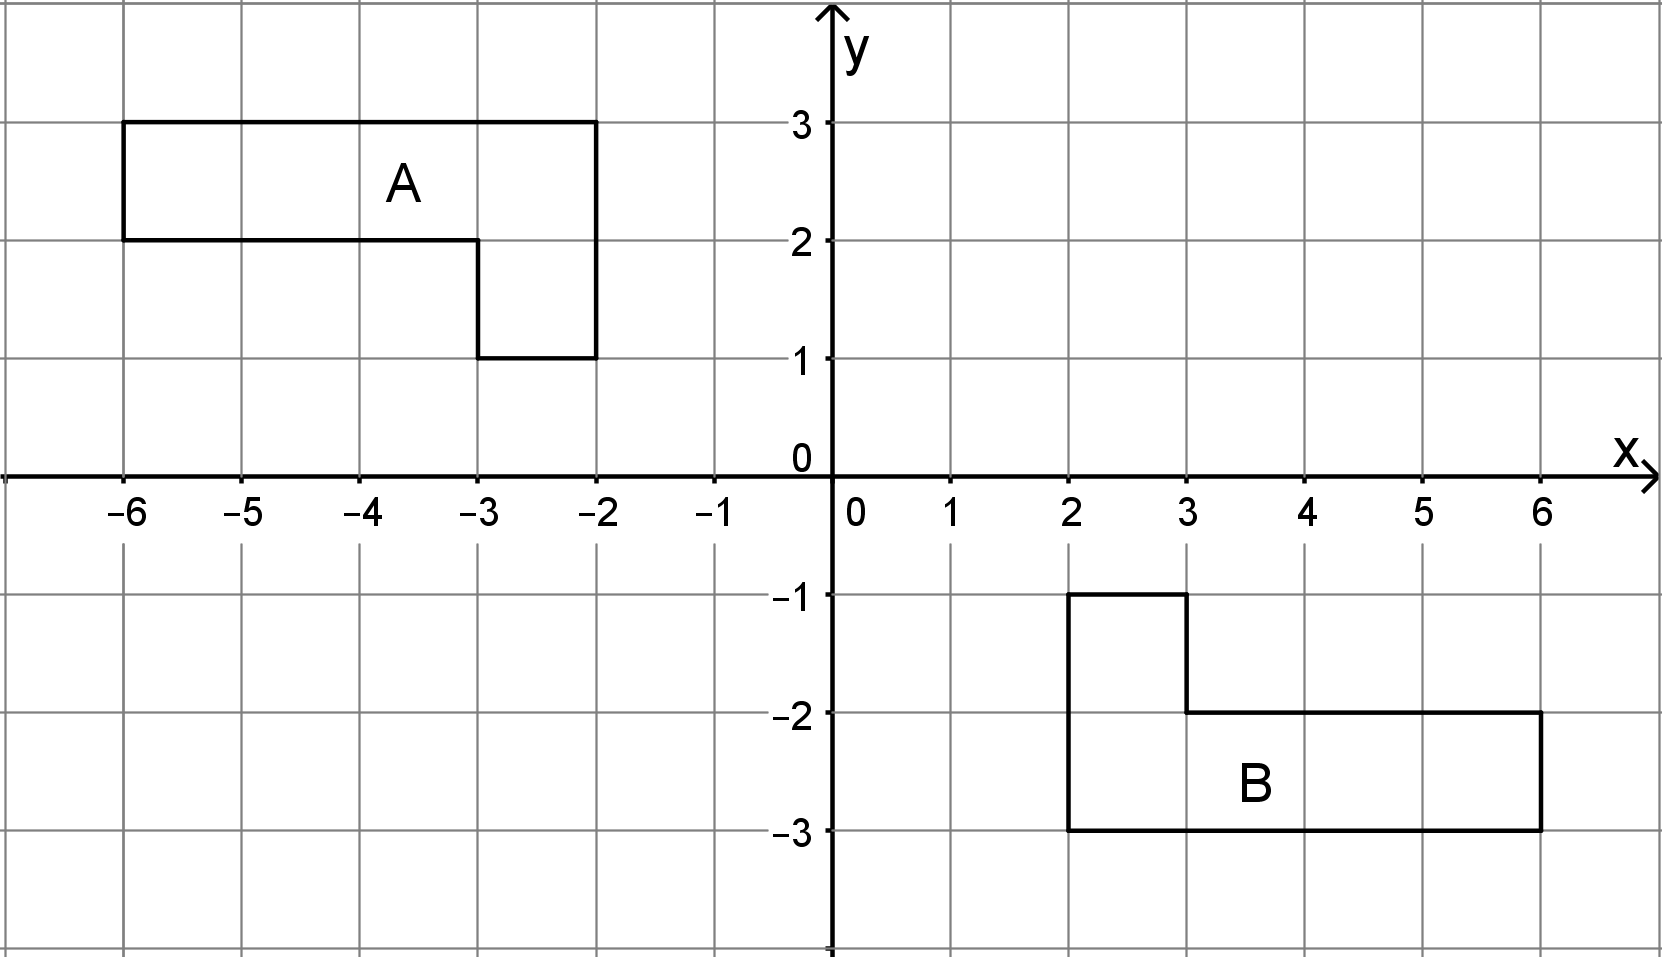
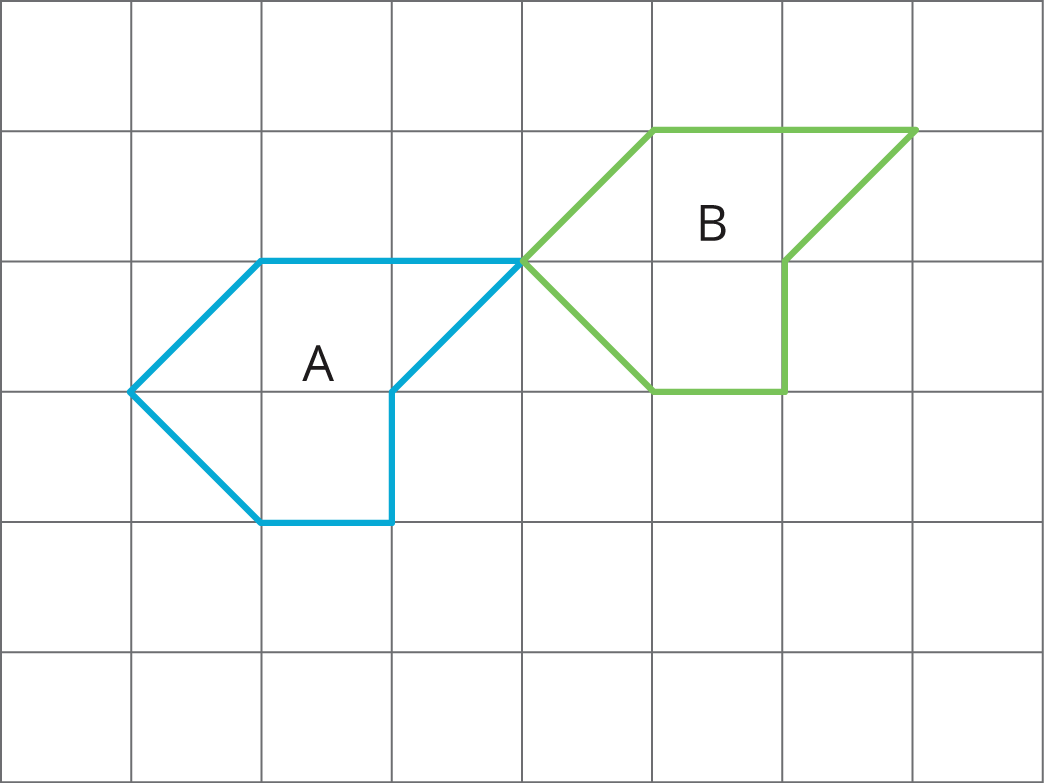
Problem 2 (from Unit 1, Lesson 4)
Describe a sequence of transformations that takes trapezoid A to trapezoid B.
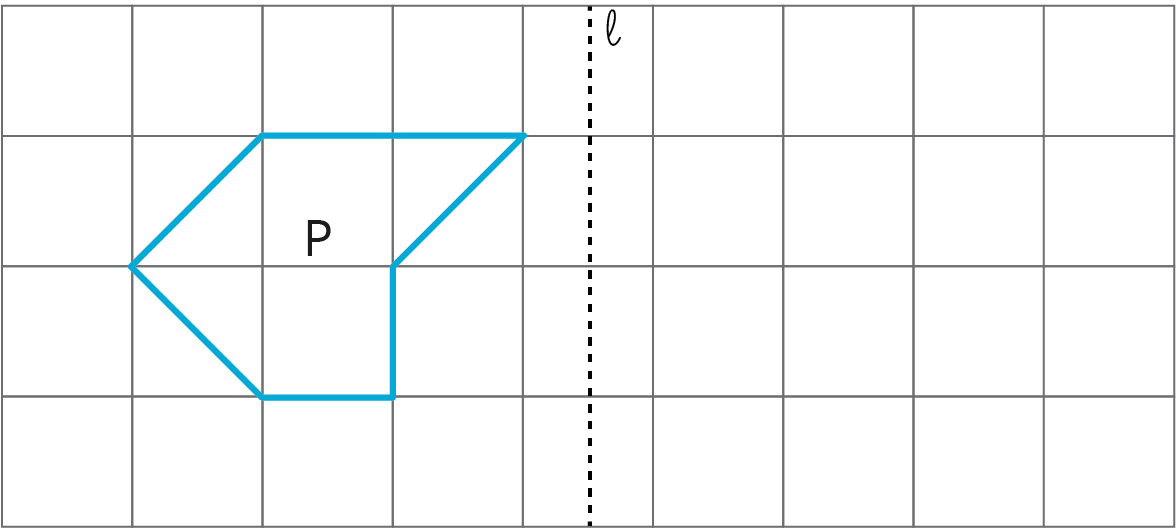
Problem 3 (from Unit 1, Lesson 3)
Reflect polygon $P$ using line $\ell$.
Lesson 6
Problem 1
Here is Trapezoid A in the coordinate plane:
- Draw Polygon B, the image of A, using the $y$-axis as the line of reflection.
- Draw Polygon C, the image of B, using the $x$-axis as the line of reflection.
- Draw Polygon D, the image of C, using the $x$-axis as the line of reflection.
Problem 2
The point $(\text{-}4,1)$ is rotated 180 degrees counterclockwise using center $(\text{-}3,0)$. What are the coordinates of the image?
- $(\text{-}5,\text{-}2)$
- $(\text{-}4,\text{-}1)$
- $(\text{-}2,\text{-}1)$
- $(4,\text{-}1)$
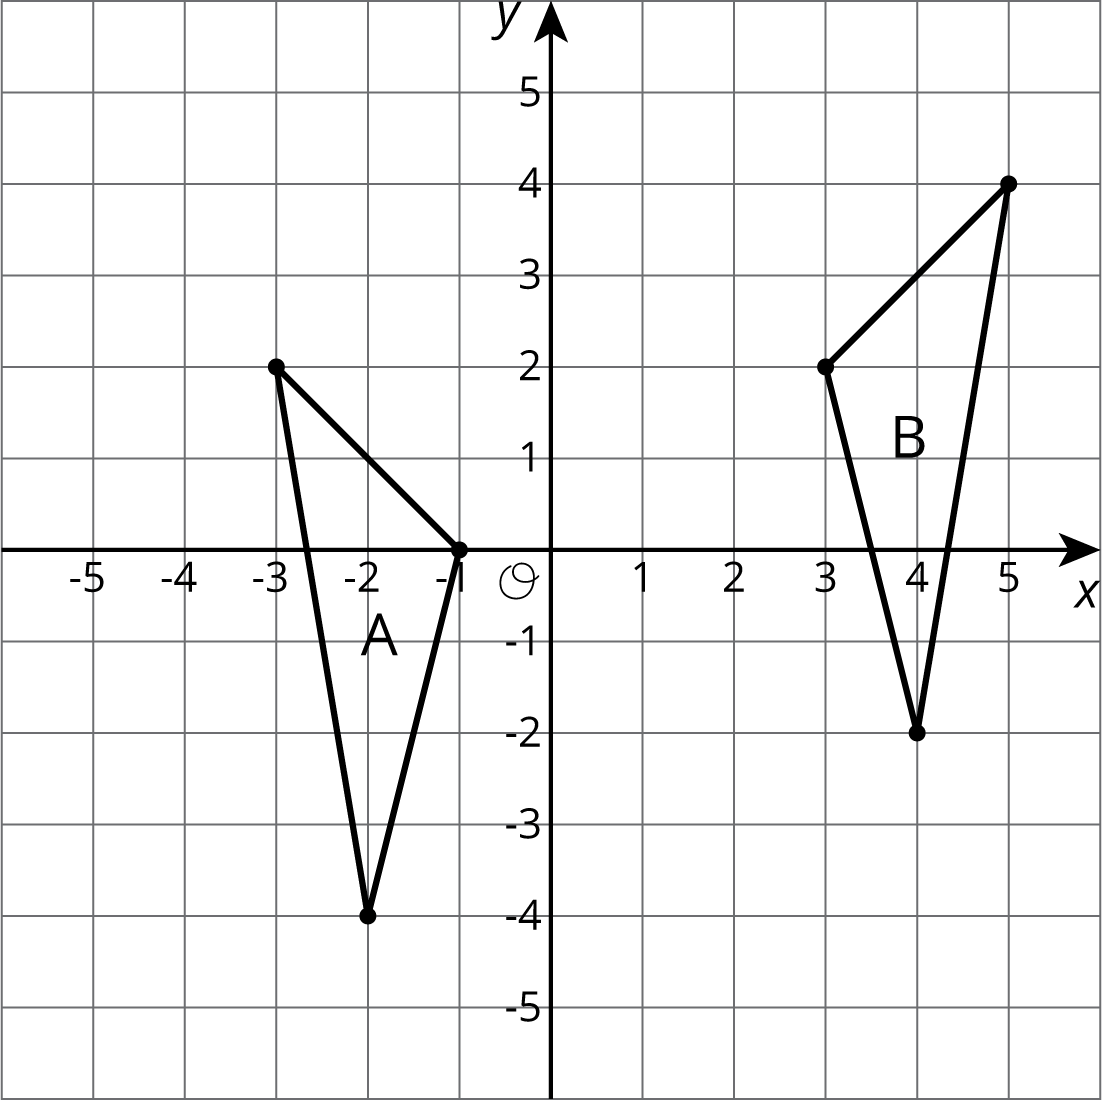
Problem 3
Describe a sequence of transformations for which Triangle B is the image of Triangle A.
Problem 4 (from Unit 1, Lesson 2)
Here is quadrilateral $ABCD$.
Draw the image of quadrilateral $ABCD$ after each transformation.
- The translation that takes $B$ to $D$.
- The reflection over segment $BC$.
- The rotation about point $A$ by angle $DAB$, counterclockwise.
Lesson 7
Problem 1
Is there a rigid transformation taking Rhombus P to Rhombus Q? Explain how you know.

Problem 2
Describe a rigid transformation that takes Triangle A to Triangle B.
Problem 3
Is there a rigid transformation taking Rectangle A to Rectangle B? Explain how you know.

Problem 4 (from Unit 1, Lesson 4)
For each shape, draw its image after performing the transformation. If you get stuck, consider using tracing paper.
- Translate the shape so that $A$ goes to $A’$.
- Rotate the shape 180 degrees counterclockwise around $B$.
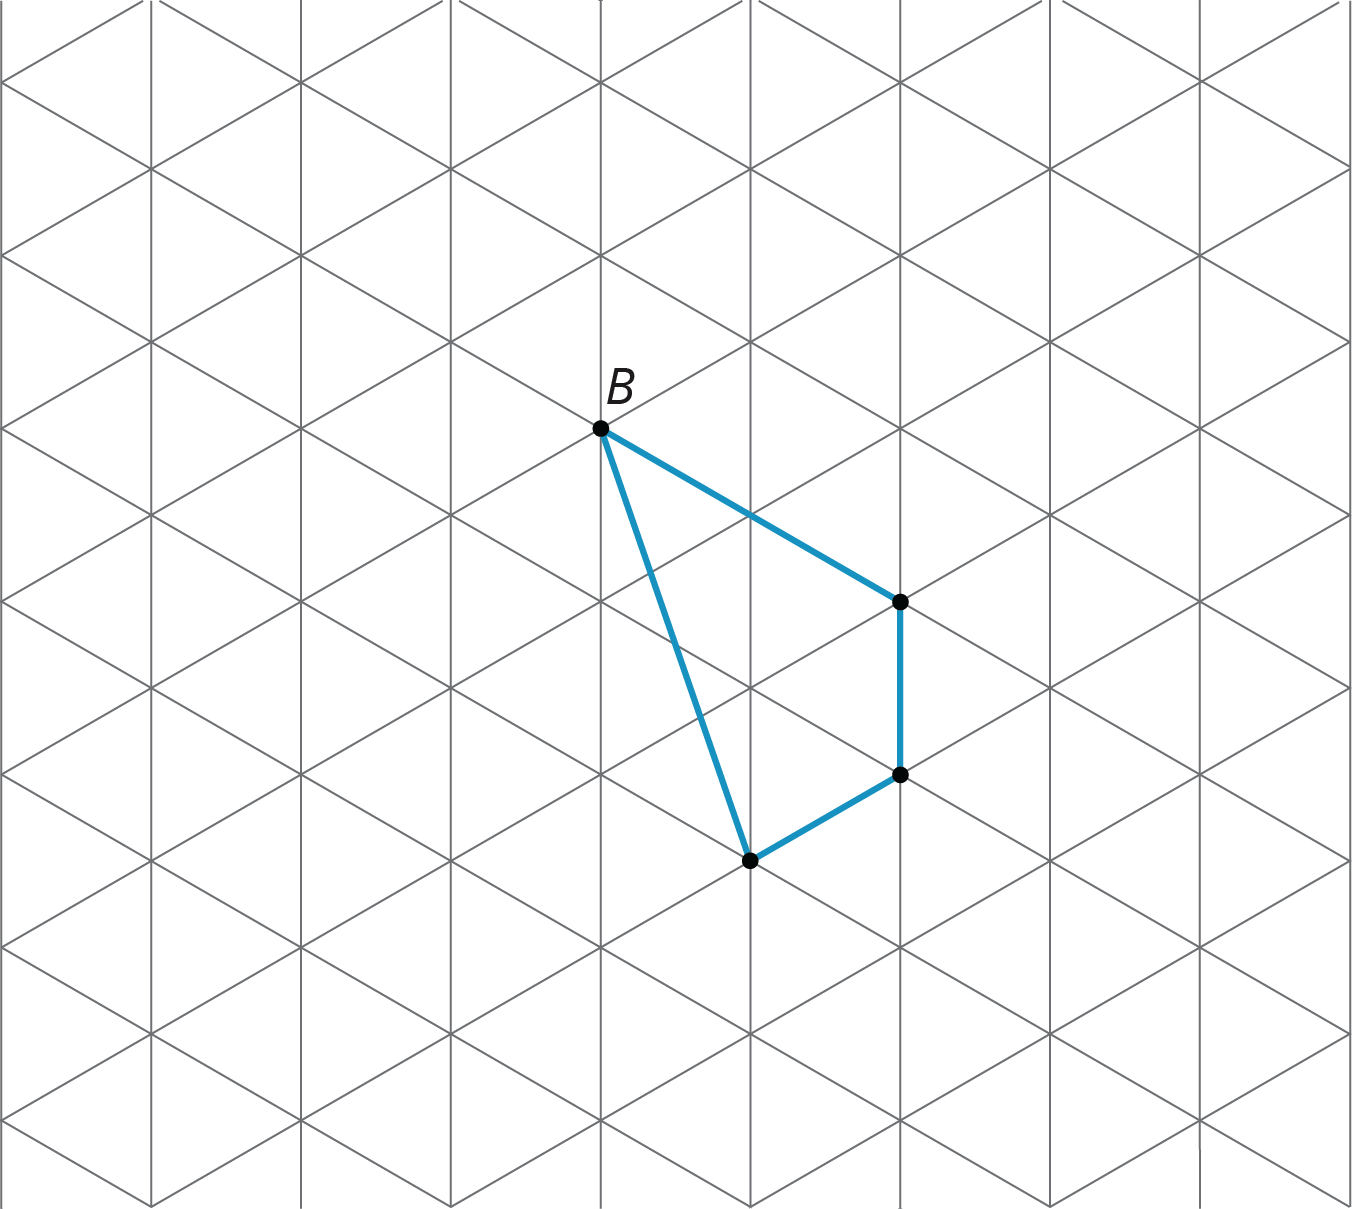
- Reflect the shape over the line shown.

Lesson 8
Problem 1
For the figure shown here,
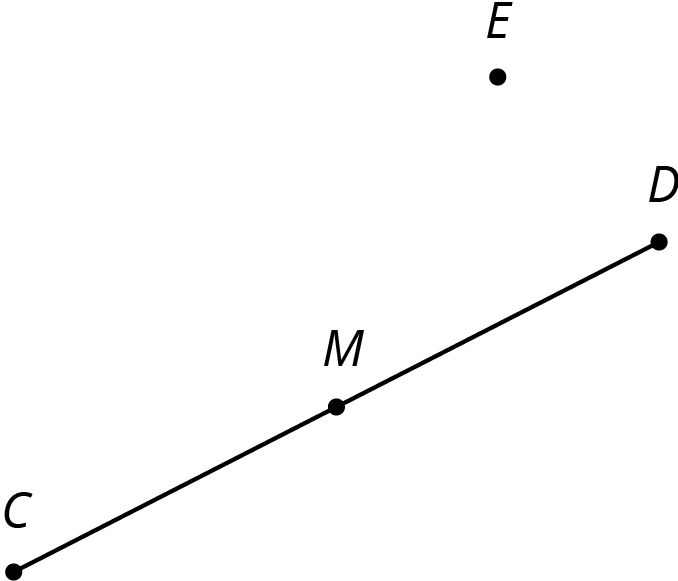
- Rotate segment $CD$ $180^\circ$ around point $D$.
- Rotate segment $CD$ $180^\circ$ around point $E$.
- Rotate segment $CD$ $180^\circ$ around point $M$.
Problem 2
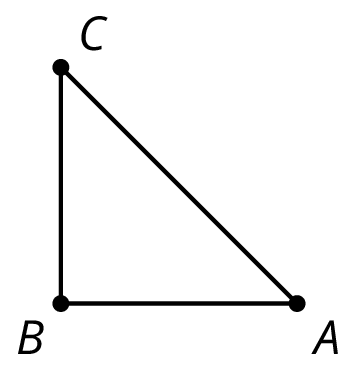
Here is an isosceles right triangle:
Draw these three rotations of triangle $ABC$ together.
- Rotate triangle $ABC$ 90 degrees clockwise around $A$.
- Rotate triangle $ABC$ 180 degrees around $A$.
- Rotate triangle $ABC$ 270 degrees clockwise around $A$.
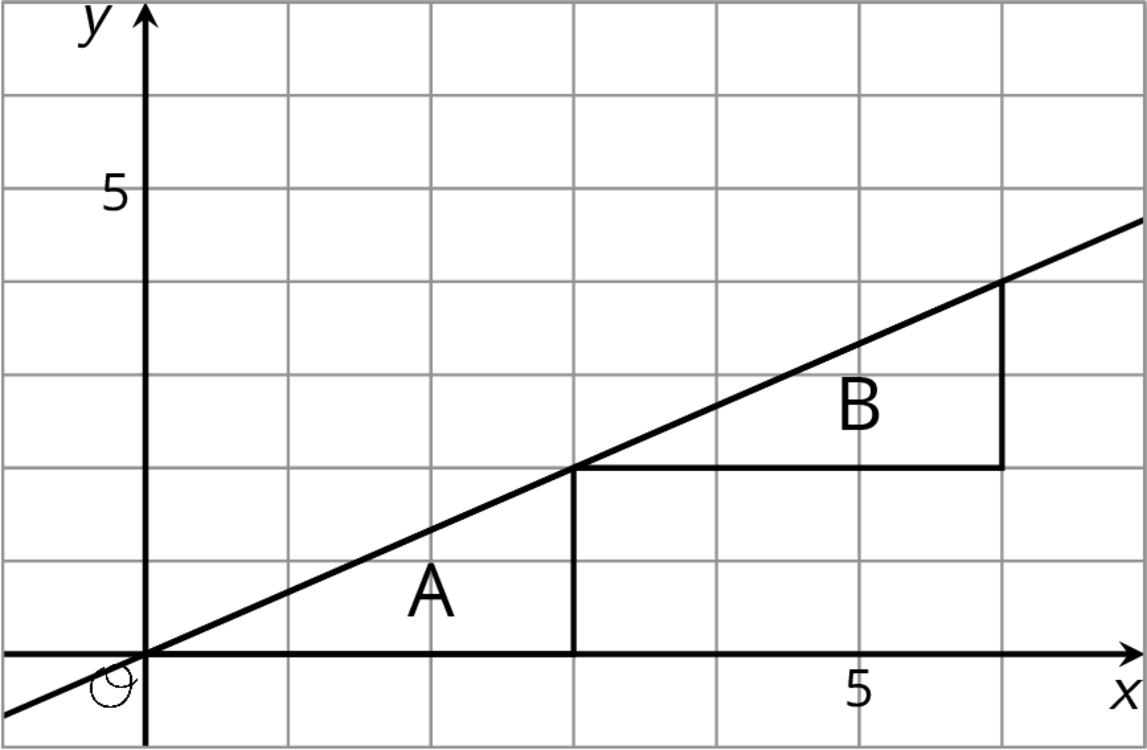
Problem 3 (from Unit 1, Lesson 5)
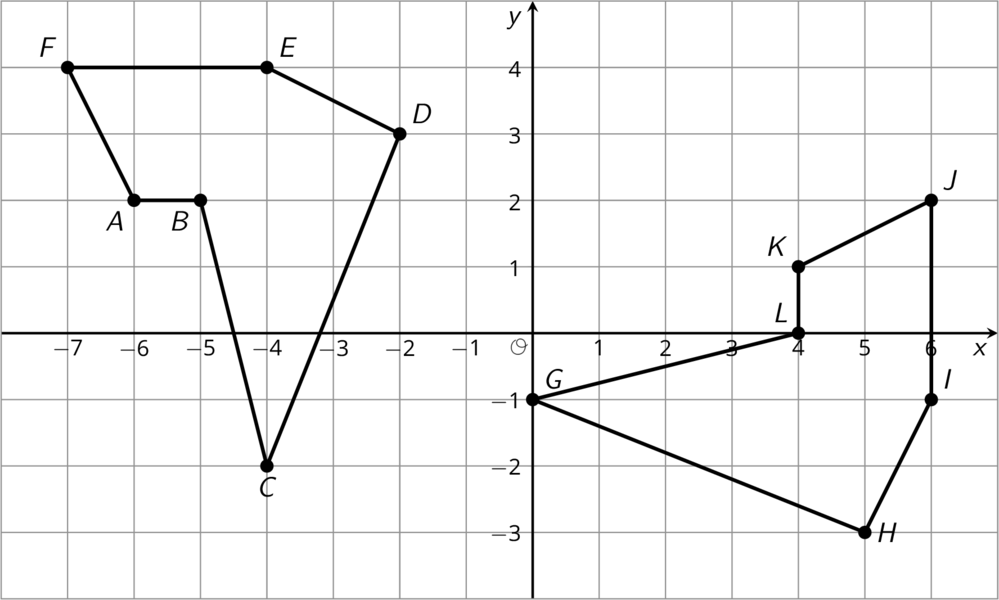
Each graph shows two polygons $ABCD$ and $A’B’C’D’$. In each case, describe a sequence of transformations that takes $ABCD$ to $A’B’C’D’$.
Problem 4 (from Unit 1, Lesson 4)
Lin says that she can map Polygon A to Polygon B using only reflections. Do you agree with Lin? Explain your reasoning.
Lesson 9
Problem 1
- Draw parallel lines $AB$ and $CD$.
- Pick any point $E$. Rotate $AB$ 90 degrees clockwise around $E$.
- Rotate $CD$ 90 degrees clockwise around $E$.
- What do you notice?
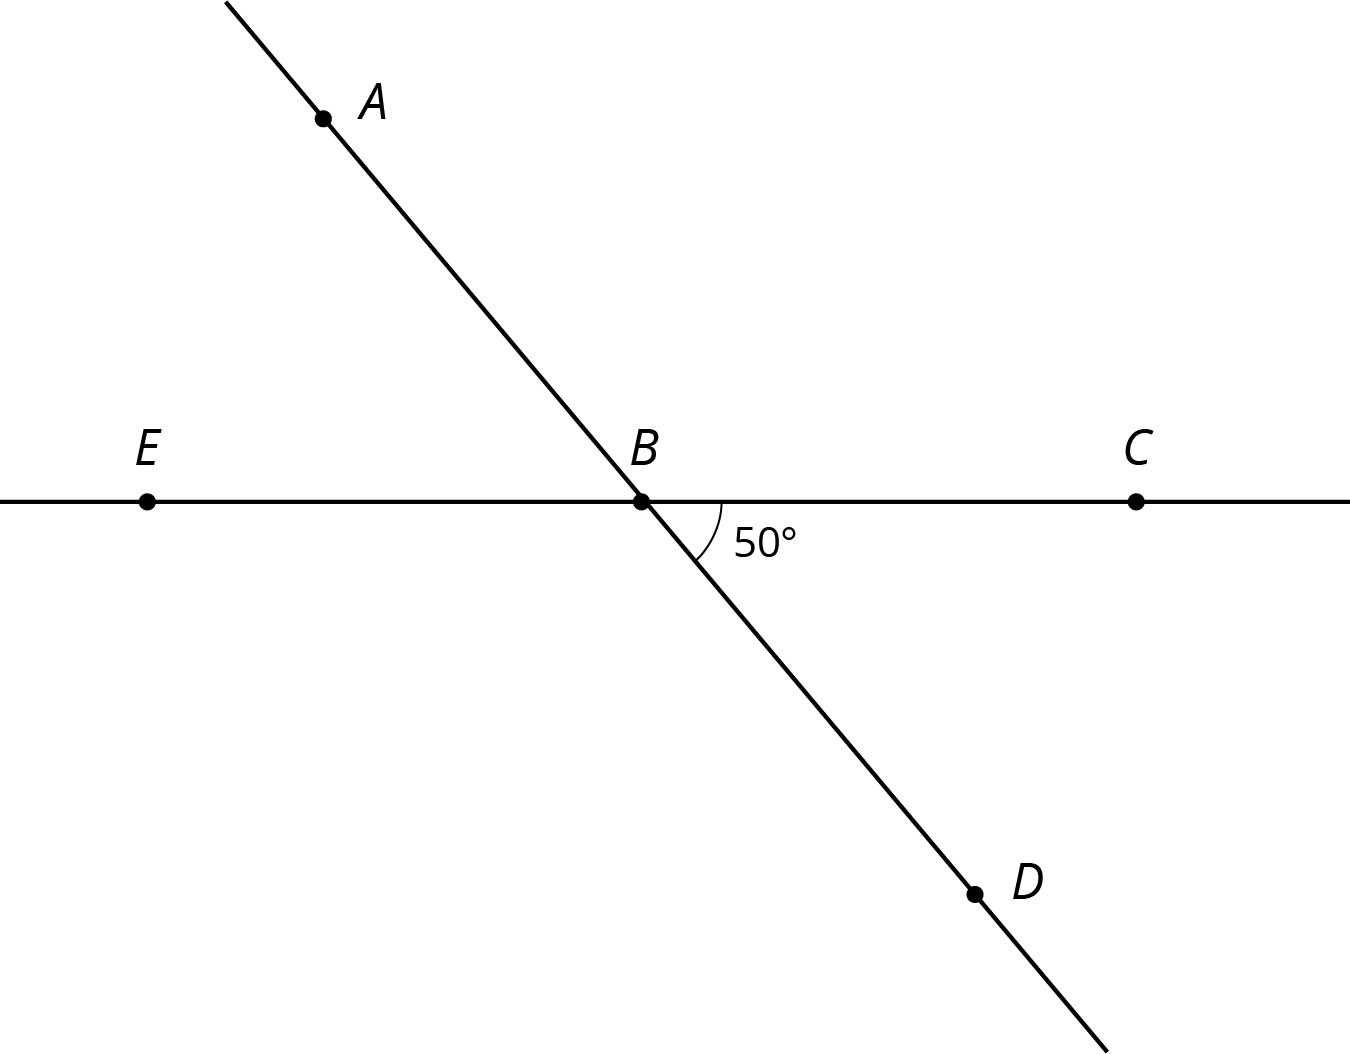
Problem 2
Use the diagram to find the measures of each angle. Explain your reasoning.
- $m{\angle ABC}$
- $m{\angle EBD}$
- $m{\angle ABE}$
Problem 3
Points $P$ and $Q$ are plotted on a line.
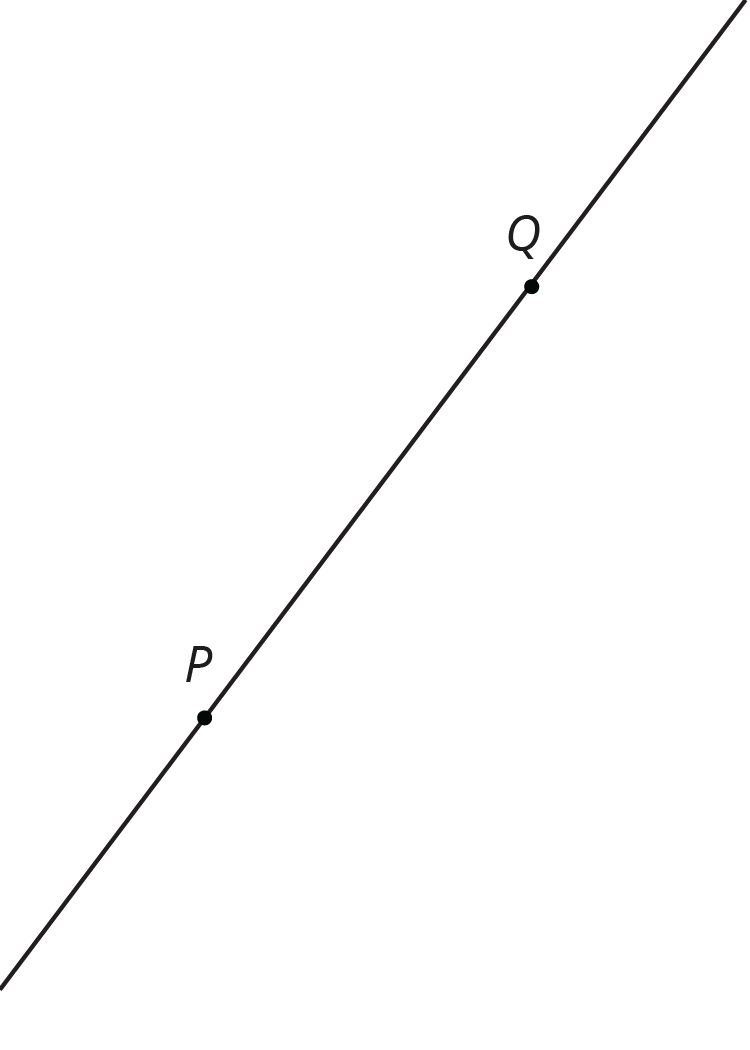
- Find a point $R$ so that a 180-degree rotation with center $R$ sends $P$ to $Q$ and $Q$ to $P$.
- Is there more than one point $R$ that works for part a?
Problem 4 (from Unit 1, Lesson 7)
In the picture triangle $A’B’C’$ is an image of triangle $ABC$ after a rotation. The center of rotation is $D$.
- What is the length of side $B’C’$? Explain how you know.
- What is the measure of angle $B$? Explain how you know.
- What is the measure of angle $C$? Explain how you know.
Problem 5 (from Unit 1, Lesson 6)
The point $(\text-4,1)$ is rotated 180 degrees counterclockwise using center $(0,0)$. What are the coordinates of the image?
- $(\text-1,\text-4)$
- $(\text-1,4)$
- $(4,1)$
- $(4,\text-1)$
Lesson 10
Problem 1
Here is the design for the flag of Trinidad and Tobago.

Describe a sequence of translations, rotations, and reflections that take the lower left triangle to the upper right triangle.
Problem 2
Here is a picture of an older version of the flag of Great Britain. There is a rigid transformation that takes Triangle 1 to Triangle 2, another that takes Triangle 1 to Triangle 3, and another that takes Triangle 1 to Triangle 4.
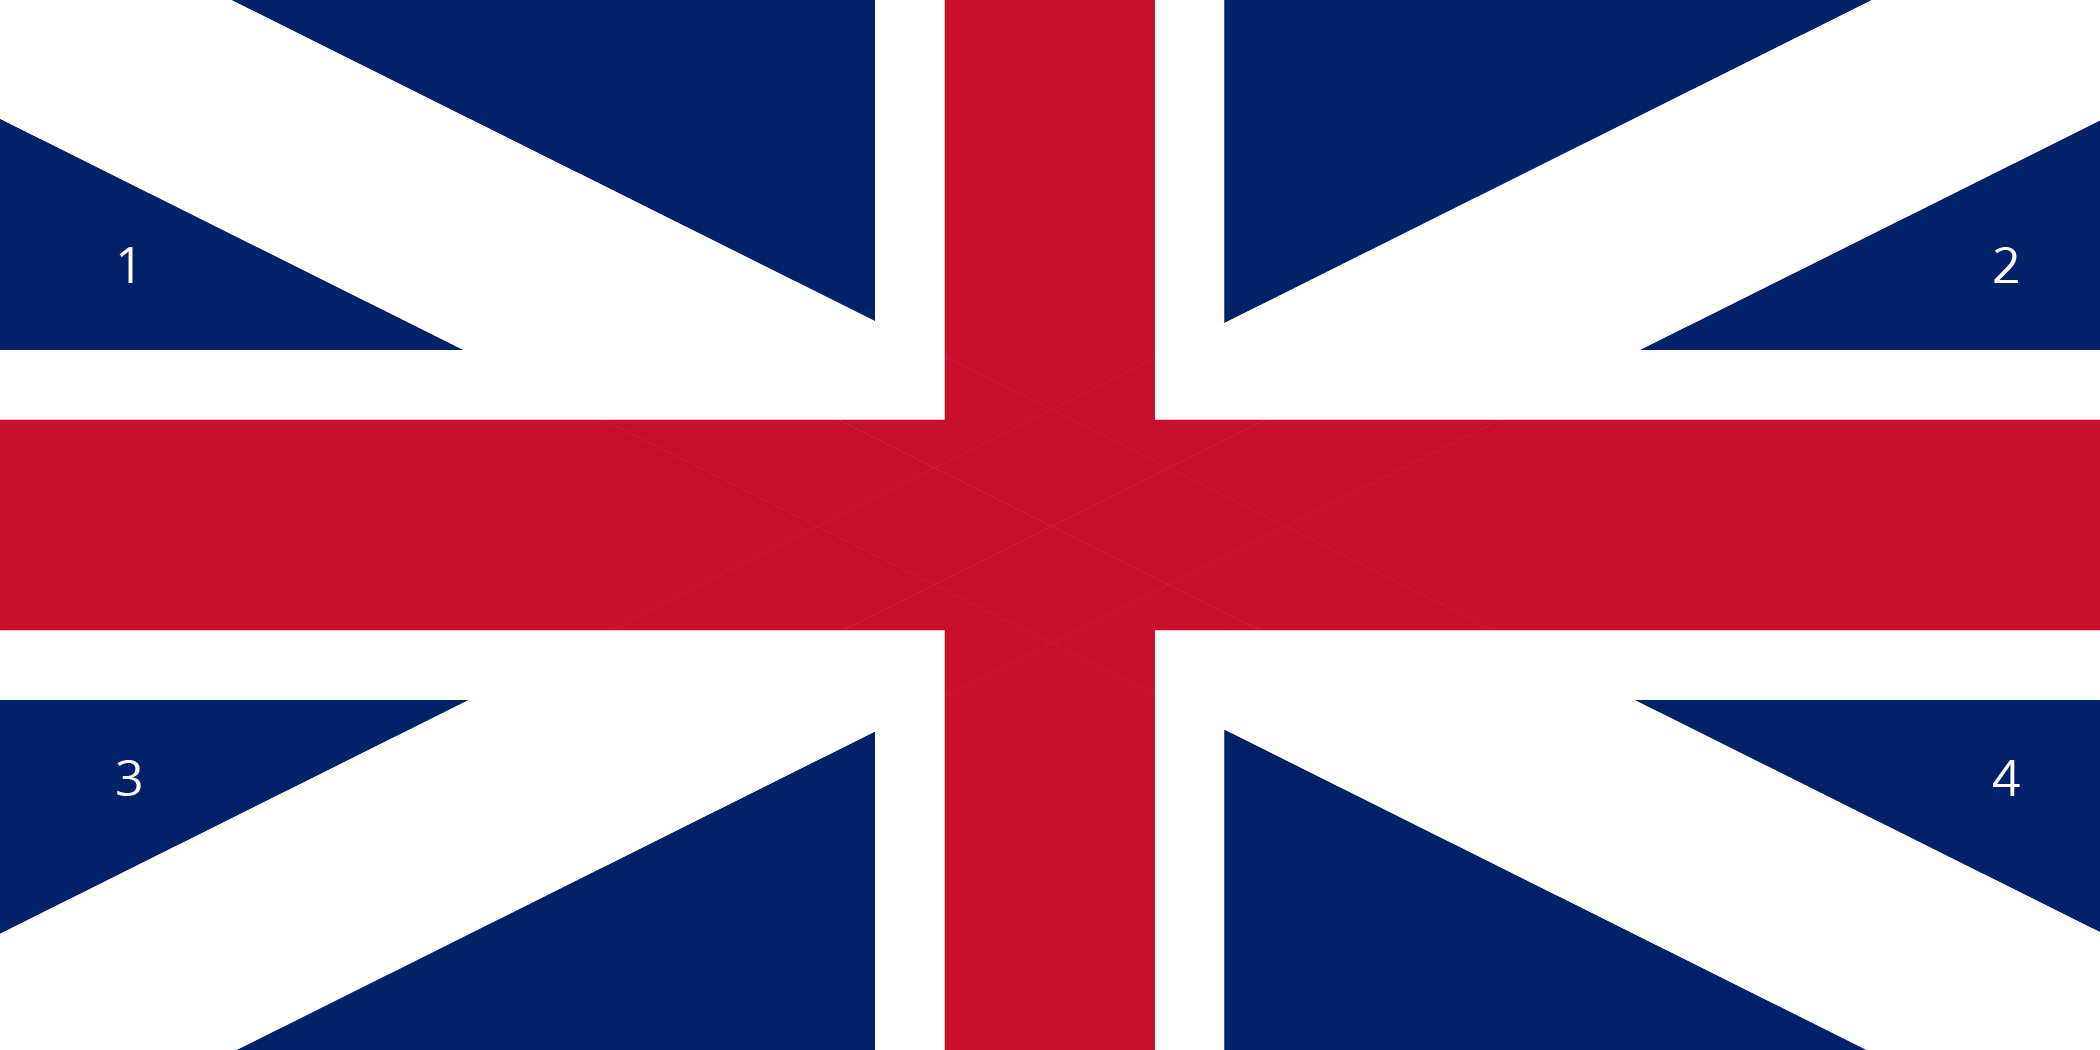
- Measure the lengths of the sides in Triangles 1 and 2. What do you notice?
- What are the side lengths of Triangle 3? Explain how you know.
- Do all eight triangles in the flag have the same area? Explain how you know.
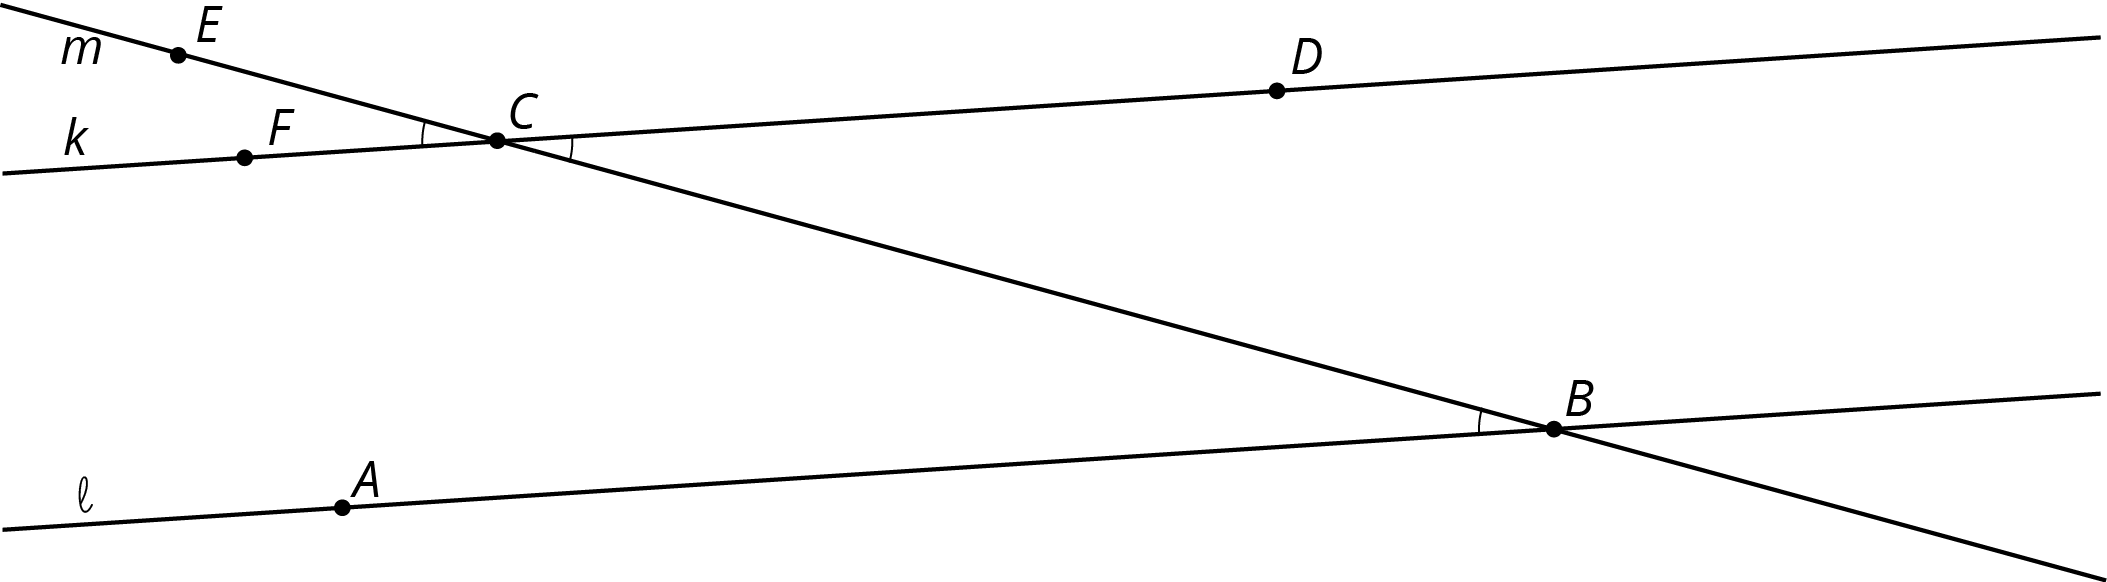
Problem 3 (from Unit 1, Lesson 9)
- Which of the lines in the picture is parallel to line $\ell$? Explain how you know.
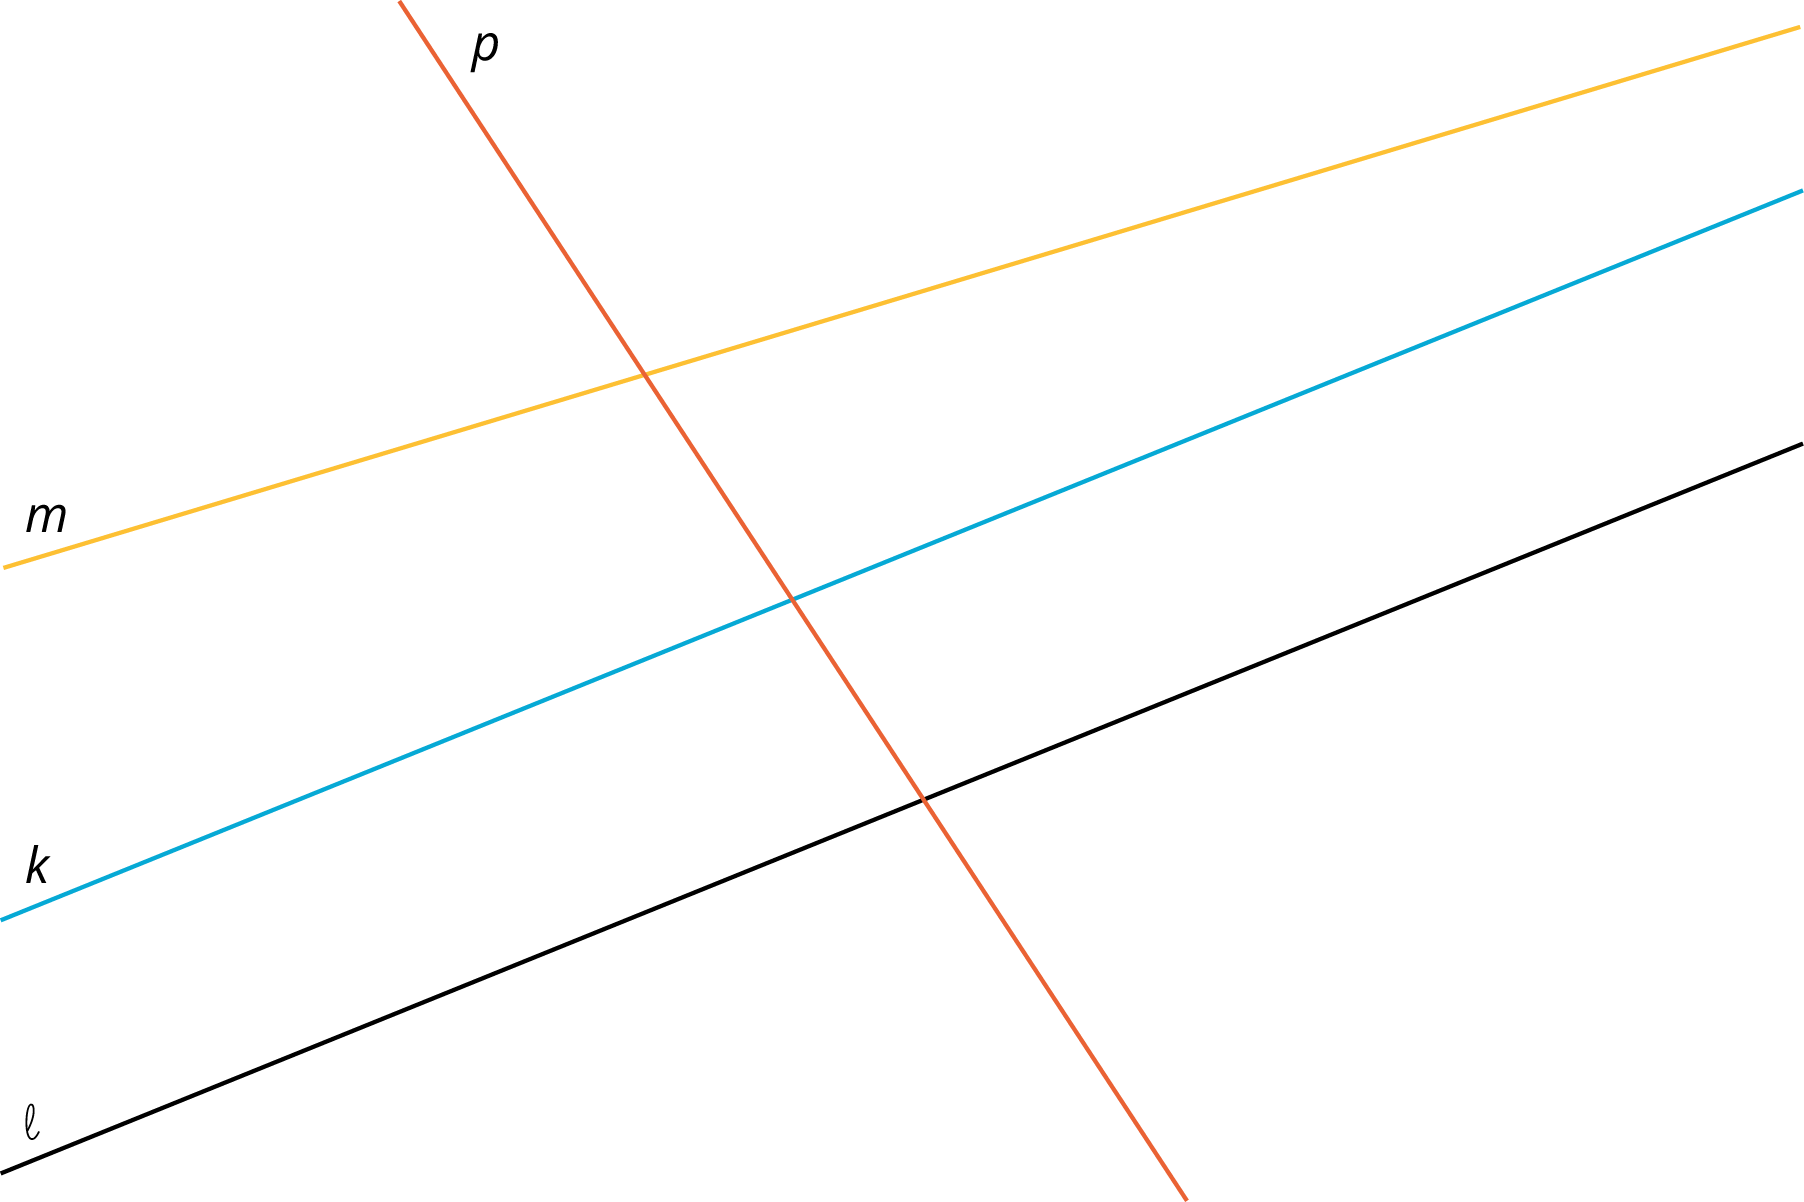
- Explain how to translate, rotate or reflect line $\ell$ to obtain line $k$.
- Explain how to translate, rotate or reflect line $\ell$ to obtain line $p$.
Problem 4 (from Unit 1, Lesson 6)
Point $A$ has coordinates $(3,4)$. After a translation 4 units left, a reflection across the $x$-axis, and a translation 2 units down, what are the coordinates of the image?
Problem 5 (from Unit 1, Lesson 8)
Here is triangle $XYZ$:

Draw these three rotations of triangle $XYZ$ together.
- Rotate triangle $XYZ$ 90 degrees clockwise around $Z$.
- Rotate triangle $XYZ$ 180 degrees around $Z$.
- Rotate triangle $XYZ$ 270 degrees clockwise around $Z$.
Lesson 11
Problem 1
If two rectangles have the same perimeter, do they have to be congruent? Explain how you know.
Problem 2
Draw two rectangles that have the same area, but are not congruent.
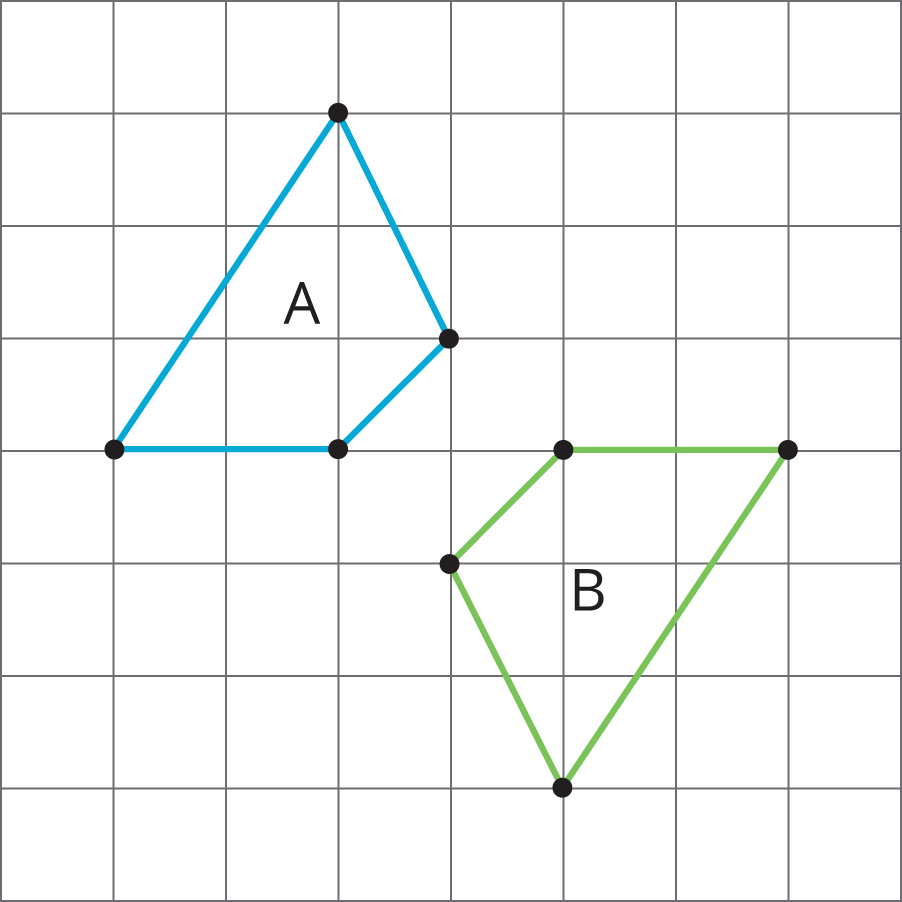
Problem 3
For each pair of shapes, decide whether or not it appears that the two shapes are congruent. Explain your reasoning.


Problem 4
-
Reflect Quadrilateral A over the $x$-axis. Label the image quadrilateral B. Reflect Quadrilateral B over the $y$-axis. Label the image C.

-
Are Quadrilaterals A and C congruent? Explain how you know.
Problem 5 (from Unit 1, Lesson 6)
The point $(\text-2,\text-3)$ is rotated 90 degrees counterclockwise using center $(0,0)$. What are the coordinates of the image?
- $(\text-3,\text-2)$
- $(\text-3,2)$
- $(3,\text-2)$
- $(3,2)$
Problem 6 (from Unit 1, Lesson 7)
Describe a rigid transformation that takes Polygon A to Polygon B.
Lesson 12
Problem 1
- Show that the two pentagons are congruent.
- Find the side lengths of $ABCDE$ and the angle measures of $FGHIJ$.
Problem 2
For each pair of shapes, decide whether or not the two shapes are congruent. Explain your reasoning.
Problem 3 (from Unit 1, Lesson 8)
- Draw segment $PQ$.
- When $PQ$ is rotated $180^\circ$ around point $R$, the resulting segment is the same as $PQ$. Where could point $R$ be located?
Problem 4 (from Unit 1, Lesson 10)
Here is trapezoid $ABCD$.

Using rigid transformations on the trapezoid, build a pattern. Describe some of the rigid transformations you used.
Lesson 13
Problem 1
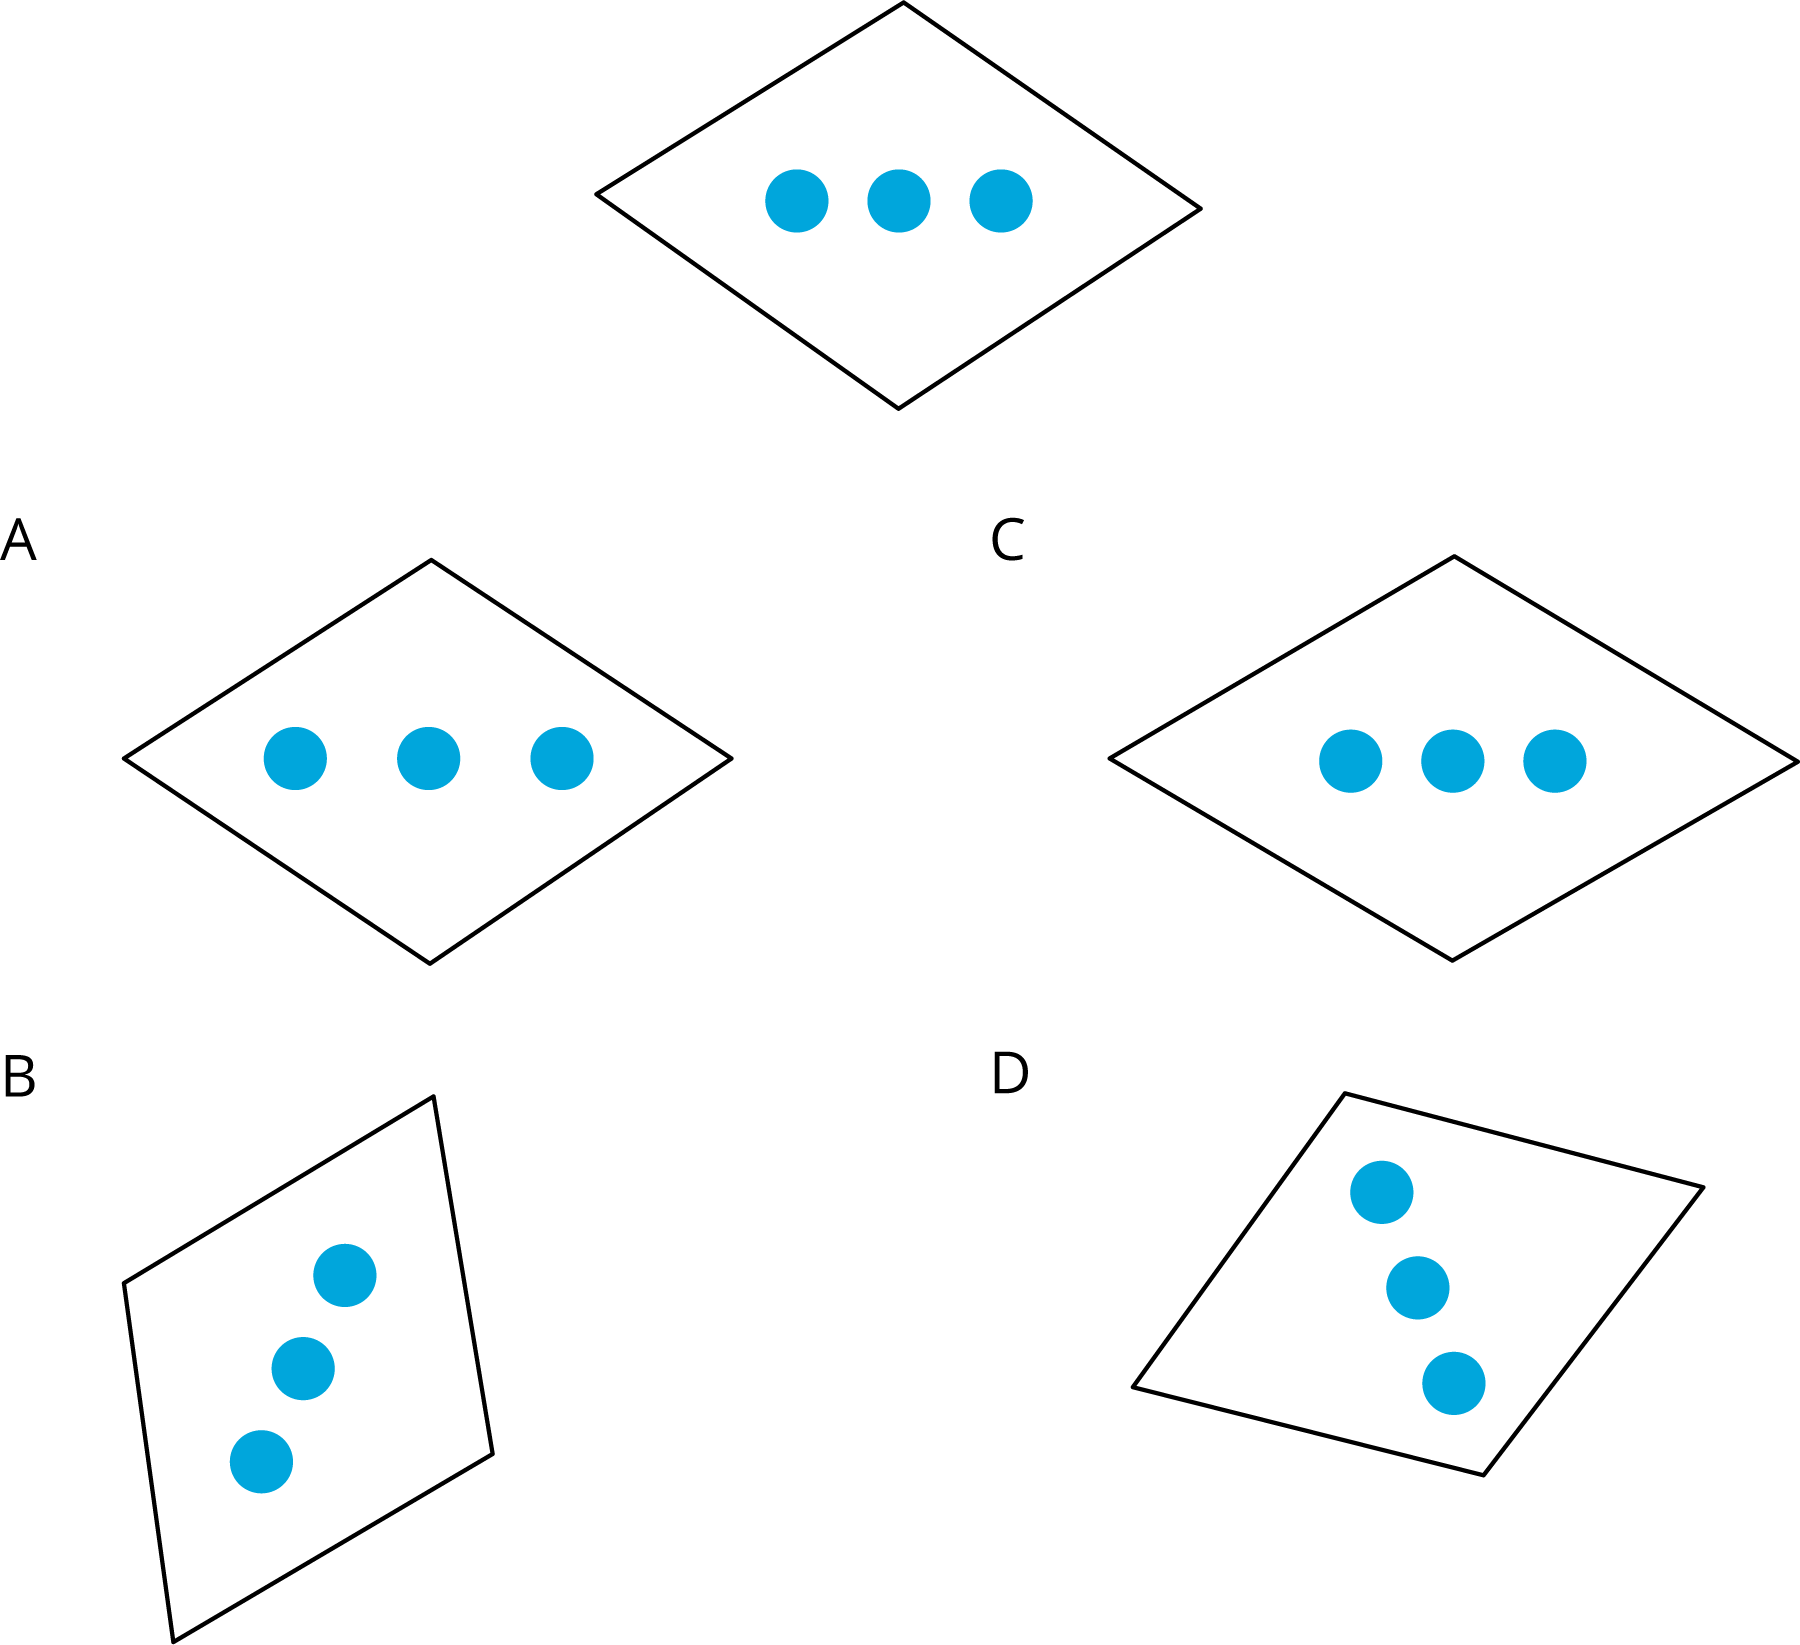
Which of these four figures are congruent to the top figure?
Problem 2
These two figures are congruent, with corresponding points marked.
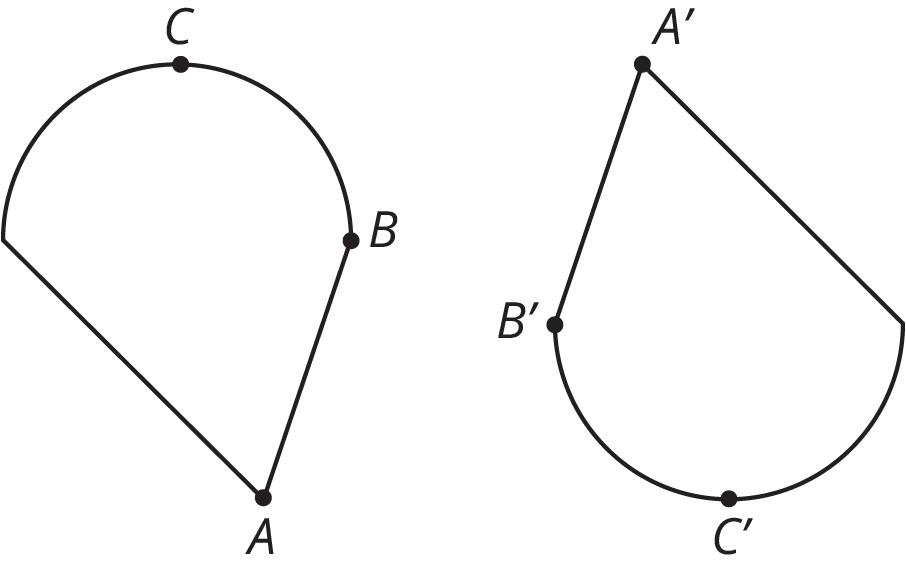
- Are angles $ABC$ and $A'B'C'$ congruent? Explain your reasoning.
- Measure angles $ABC$ and $A’B’C’$ to check your answer.
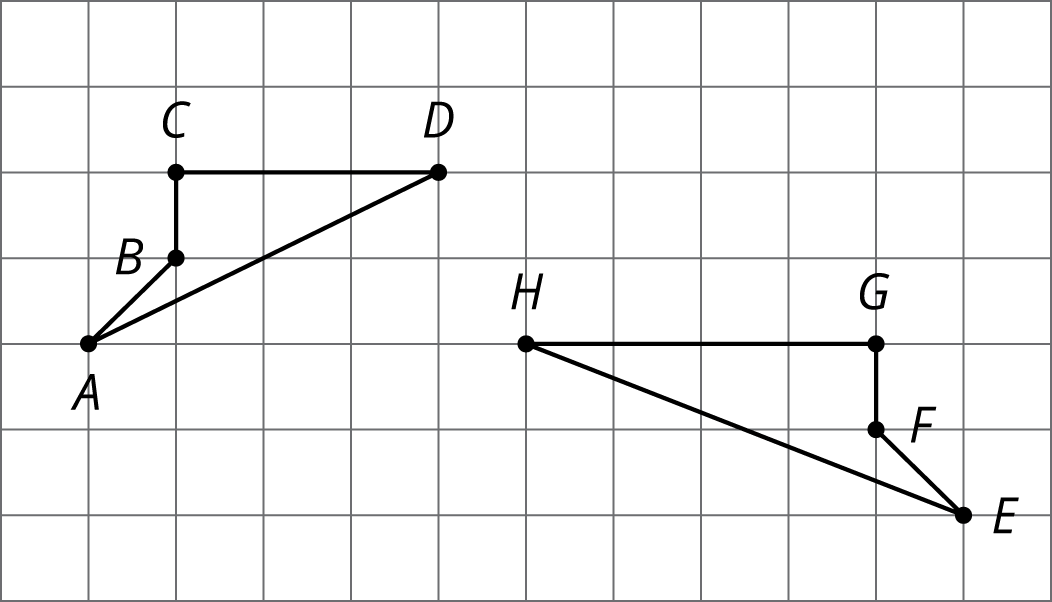
Problem 3
Here are two figures.
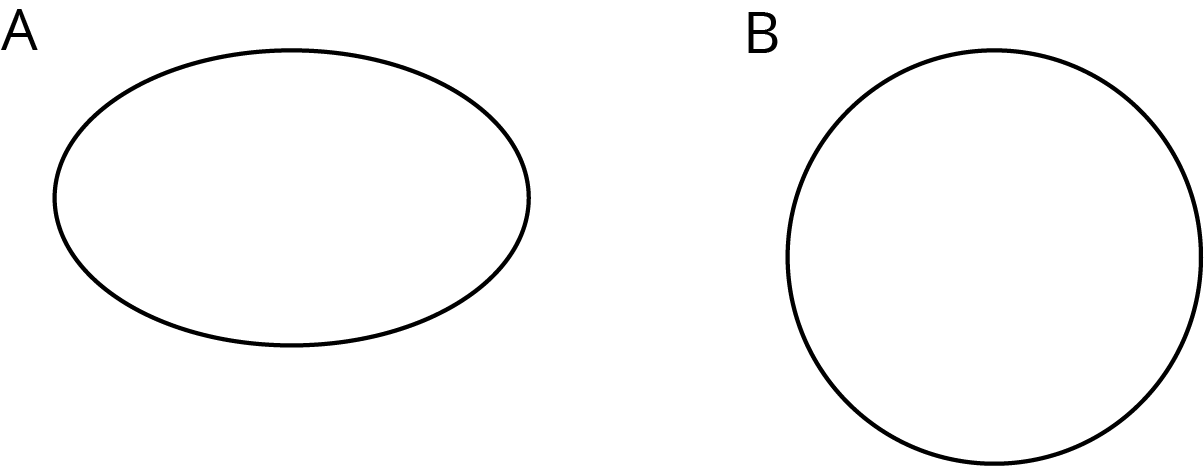
Show, using measurement, that these two figures are not congruent.
Problem 4 (from Unit 1, Lesson 3)
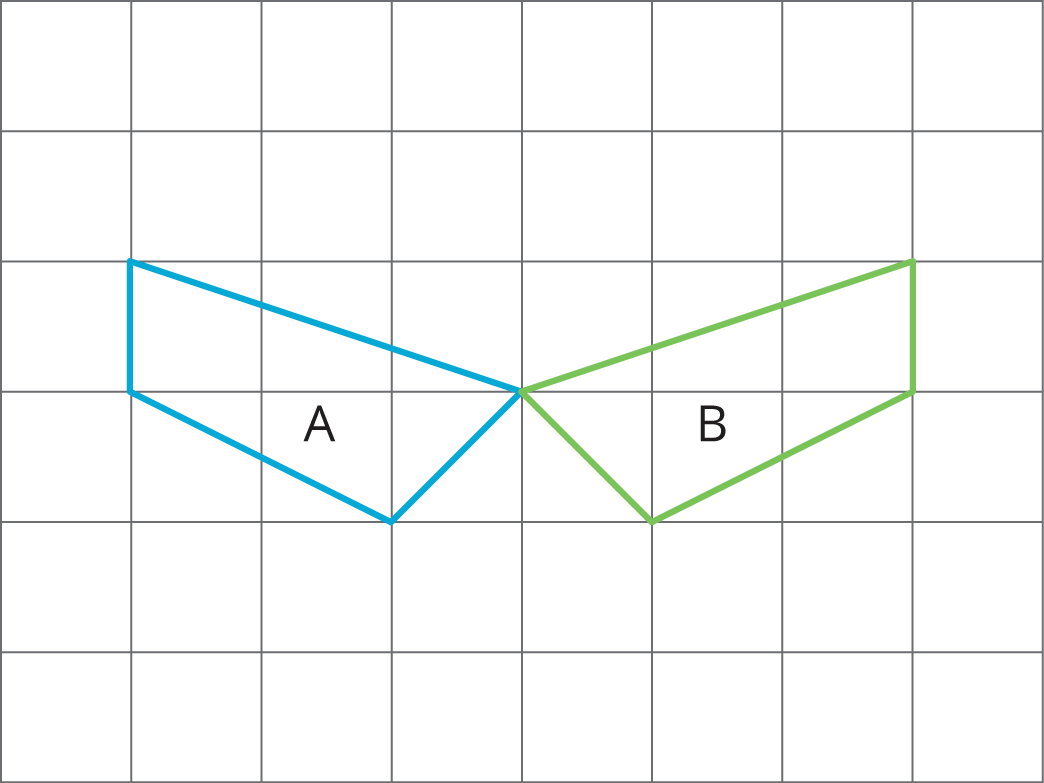
Each picture shows two polygons, one labeled Polygon A and one labeled Polygon B. Describe how to move Polygon A into the position of Polygon B using a transformation.
Lesson 14
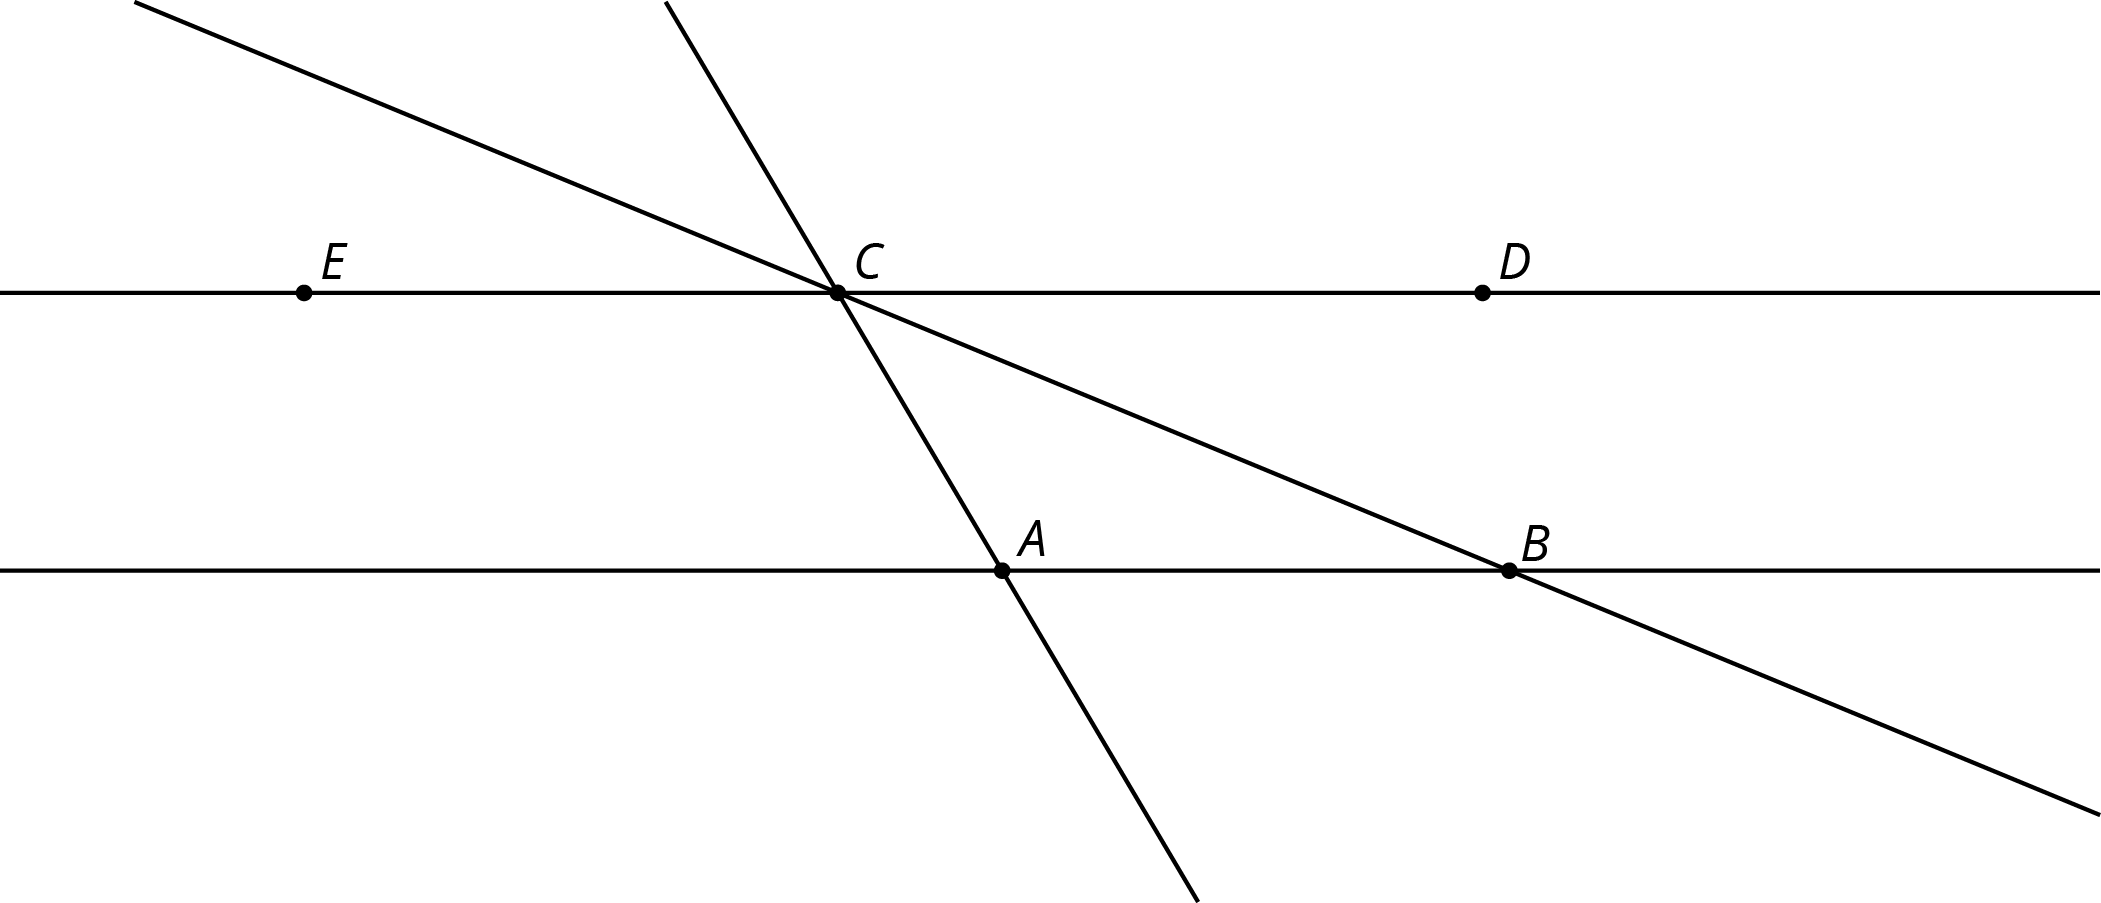
Problem 1 (from Unit 1, Lesson 9)
Use the diagram to find the measures of each angle. Explain your reasoning.
- $m{\angle ABC}$
- $m{\angle EBD}$
- $m{\angle ABE}$
Problem 2
Lines $k$ and $\ell$ are parallel, and the measure of angle $ABC$ is 19 degrees.
- Explain why the measure of angle $ECF$ is 19 degrees. If you get stuck, consider translating line $\ell$ by moving $B$ to $C$.
- What is the measure of angle $BCD$? Explain.
Problem 3
The diagram shows three lines with some marked angle measures.
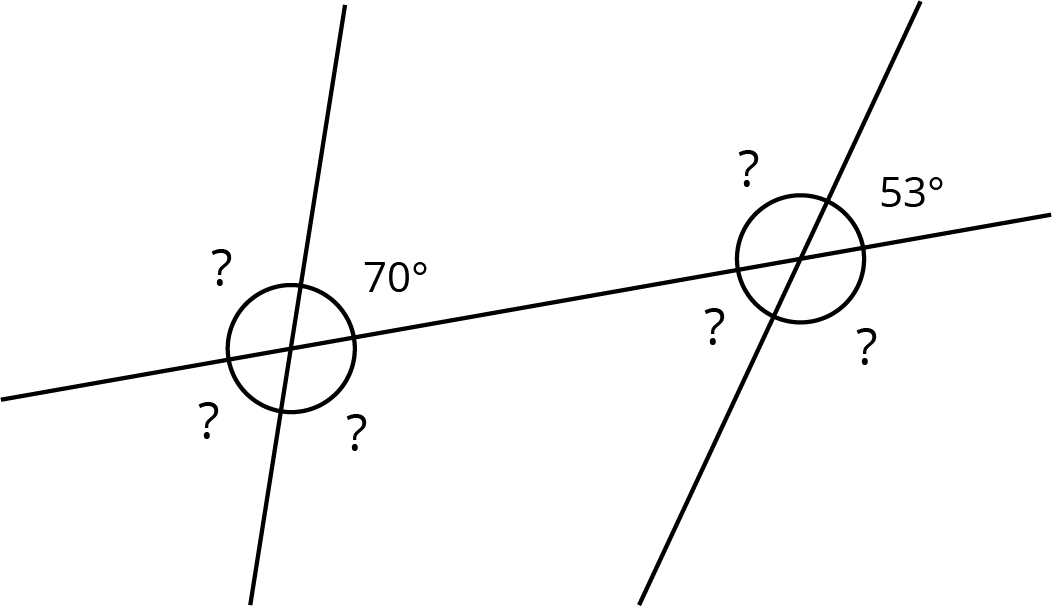
Find the missing angle measures marked with question marks.
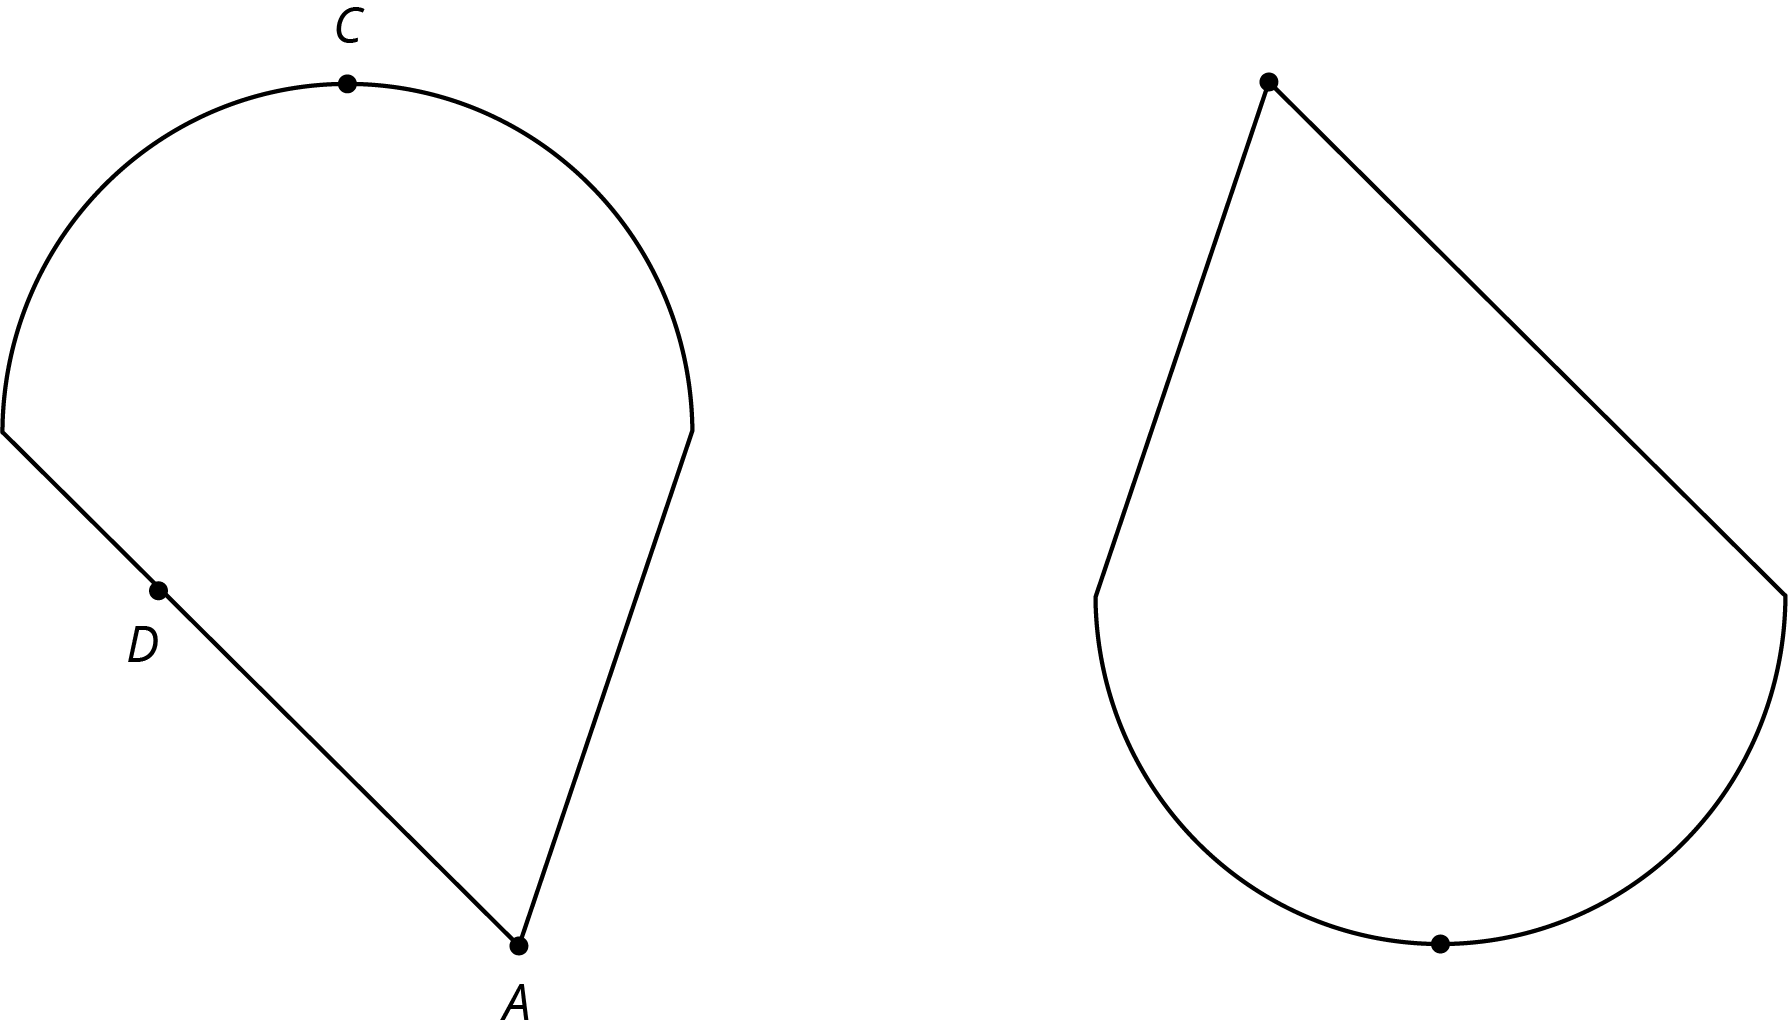
Problem 4
The two figures are scaled copies of each other.
- What are some ways that you can tell they are scaled copies?
- What is the scale factor that takes Figure 1 to Figure 2?
- What is the scale factor that takes Figure 2 to Figure 1?

Lesson 15
Problem 1
In triangle $ABC$, the measure of angle $A$ is $40^\circ$.
- Give possible measures for angles $B$ and $C$ if triangle $ABC$ is isosceles.
- Give possible measures for angles $B$ and $C$ if triangle $ABC$ is right.
Problem 2
For each set of angles, decide if there is a triangle whose angles have these measures in degrees:
- 60, 60, 60
- 90, 90, 45
- 30, 40, 50
- 90, 45, 45
- 120, 30, 30
If you get stuck, consider making a line segment. Then use a protractor to measure angles with the first two angle measures.
Problem 3
Angle $A$ in triangle $ABC$ is obtuse. Can angle $B$ or angle $C$ be obtuse? Explain your reasoning.
Problem 4 (from Unit 1, Lesson 3)
For each pair of polygons, describe the transformation that could be applied to Polygon A to get Polygon B.
Problem 5 (from Unit 1, Lesson 14)
On the grid, draw a scaled copy of quadrilateral $ABCD$ using a scale factor of $\frac12$.
Lesson 16
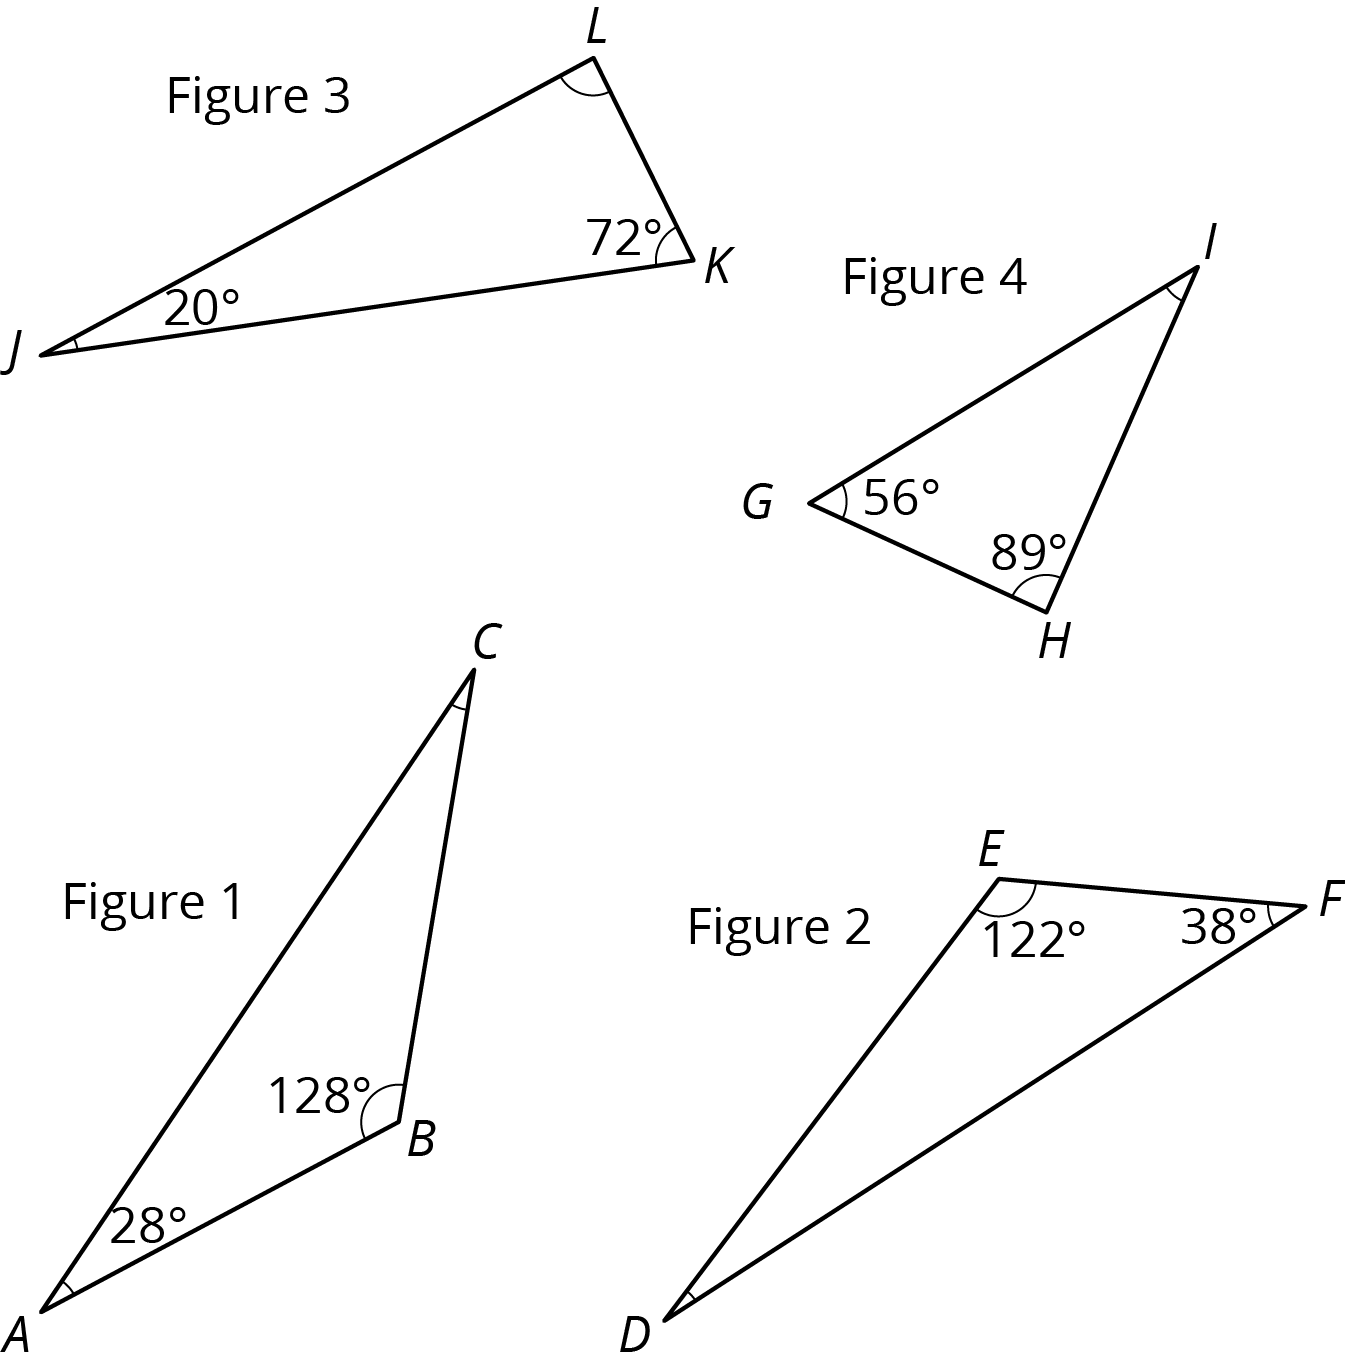
Problem 1
For each triangle, find the measure of the missing angle.
Problem 2
Is there a triangle with two right angles? Explain your reasoning.
Problem 3
In this diagram, lines $AB$ and $CD$ are parallel.
Angle $ABC$ measures $35^\circ$ and angle $BAC$ measures $115^\circ$.
- What is $m{\angle ACE}$?
- What is $m{\angle DCB}$?
- What is $m{\angle ACB}$?
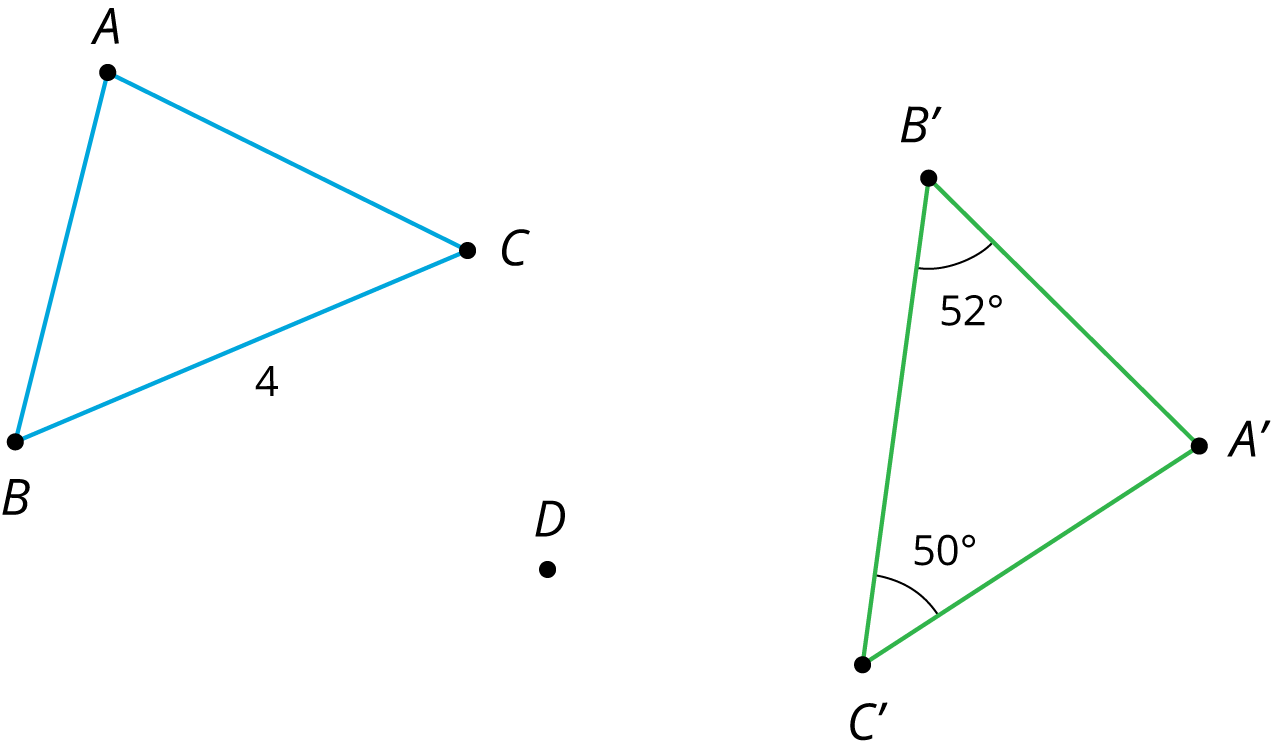
Problem 4 (from Unit 1, Lesson 13)
The two figures are congruent.
- Label the points $A’$, $B’$ and $C’$ that correspond to $A$, $B$, and $C$ in the figure on the right.

- If segment $AB$ measures 2 cm, how long is segment $A’B’$? Explain.
- The point $D$ is shown in addition to $A$ and $C$. How can you find the point $D’$ that corresponds to $D$? Explain your reasoning.
Lesson 17
No practice problems for this lesson.